Saturday 22 December 2012

Francais Couture: Square Cream Card

These new stamps from Dimension Stamps work well in any colour! I have used the Francais Couture stamp set (stamp ref: 2400074a).


How To Make
  • Stamp a background of the large words onto 12.8cm x 12.8cm piece of dark cream card in brown ink.
  • Next stamp the back of the corset and “Have a Glamorous Birthday” onto cream card in brown ink.
  • Cut out the corset and punch holes and thread gold cord over the ribbon.
  • Then cut out “Have a Glamorous Birthday” and mount first onto dark cream card then onto brown pearl card.
  • Next cut a 13.8cm x 13.8cm piece of gold pearl paper, and centrally attach to a small square cream card.
  • Attach narrow gold edge cream ribbon down the centre of the stamped dark cream card, and across one third down on the right of the ribbon and across two thirds down on the left of the ribbon.
  • Then attach “ Have a Glamorous Birthday” to the top left  corner.
  • To finish off add three cream lace leaves and five small lace daises in the bottom left hand corner (use a brown ink pad on the daises), Then shape and attach the corset to the right of the card with 3D glue.

Friday 21 December 2012

Flower Powered: I Love You Red and Black

Here is another card is made using the new Flower Powered stamp set from Dimension Stamps (stamp ref: 2400075a).


How To Make
  • Stamp the flower with swirls onto a 9.5cm x 9.5cm piece of red card in black pigment ink and black emboss.
  • Next stamp “I Love You” (from Grand Word Perfect 2 stamp ref: 1803069a) in the top right hand corner in black.
  • Mount onto silver card and 3D gloss the flowers and petals
  • Then stamp the flowers with swirls on to each corner of small square black card in black ink and black or clear emboss.
  • Finally centrally attach the red card when dry.
What a perfect Valentines day card!


Thursday 20 December 2012

Francais Couture: Black and Red card

Another card made using the new Dimension Stamps Francais Couture stamp set (stamp ref: 2400074a) set.


This one is really quick to make!
How To Make
  • Stamp the large words in the top right and bottom left hand corners of an A5 black card using a Versamark pad and clear emboss it.
  • Next stamp the front of the corset and bow onto black card in black pigment ink and black emboss them
  • Colour the ribbons and bows in red cosmic shimmer.
  • Die cut a champagne glass (old Sizzlits die) and fancy circle (Grand Decorative Circle One LF-015) from white card.
  • Then stamp the large words over the white circle in black ink.
  • Next paint the two hearts on the glass in red cosmic shimmer.
  • I then applied modpodge sparkle to the circle
  • Attach the circle to the top of the card when dry, and the glass to the bottom right hand corner with a single red rose and the bow.
  • Finally cut out shape the black corset and attach red chiffon ribbon to the bottom of the corset on the back, and attach to the white circle with 3D glue or foam pads.


Wednesday 19 December 2012

Flower Powered: Brown and Cream Bike

This card is made using the new Flower Powered stamp set from Dimension Stamps (stamp ref: 2400075a). I think this bike looks lovely stamped in the muted shades.


How To Make
  • For the background stamp the bike onto each corner of a 19cm x 19cm piece of dark cream card, in opposite corners have the seat and handlebars facing into the centre of the card, in the other two corners have the wheels, stamp flower powered on an angle on each side in memento rich cocoa, edge with a brown promarker.
  • Across the bottom left hand corner attach a piece of dark cream and brown ribbon.
  • Then centrally attach it to a 20cm x 20cm square Kraft card
  • Next stamp the bike onto a 16cm x 10.7cm piece of cream card, colour in with brown toning promarkers.
  • Then distress with tea dye and edge in a brown promarker.
  • Mount onto a 16.6cm x 11.3cm piece of Kraft card edge in brown.
  • Finally, centrally attach to the card and add a cream fabric flower over the ribbons.


Tuesday 18 December 2012

Francais Couture: On Your Retirement

Here's the lovely sofa from Francais Couture stamp set ( Stamp ref: 2400074a) set Dimension Stamps. This time I used it for a masculine retirement card and it works perfectly!


How To Make
  • First I attached a piece of burgundy and cream striped backing paper to an A5 cream card.
  • Then I die cut a cream scalloped oval stamp and stamp on a background using stamps from Mr Sophisticated stamp set (stamp ref: 2400026a) and “Retirement” Grand Word Perfect 2 (stamp ref: 1803069a) in memento rich cocoa. To finish it off I distressed with Tea Dye all over and working Aged Mahogany around the outside edge to make it a lot darker.
  • Next I stamped the sofa twice onto brown card in black ink and again onto red card with an extra round cushion.
  • Colour in the buttons on the red sofa in black.
  • Then cut out one of the brown sofas and the arms and back swirls from the other brown sofa, cut out the fabric from the red sofa and the extra round cushion, and attach to the brown sofa with the arms and back swirls, 3D gloss all the brown parts on the sofa.
  • Next stamp “On Your Retirement” into the banner frame (from Grand Word Perfect 2 stamp ref: 1803069a) in black pigment ink and clear emboss it.
  • Then stamp the top hat and cane (from Mr Sophisticated) onto brown card in black ink, colour in the ribbon on the hat and the top of the cane.
  • To finish the card attach the oval to the bottom of the card with the red “On Y our Retirement” above it with foam pads, attach the sofa to the oval with the hat and cane on the sofa, 3D gloss the hat and cane.


Monday 17 December 2012

Francais Couture: 70th Birthday

Francais Couture is a new stamp set from Dimension Stamps (stamp ref: 2400074a). I really like the sofa as it will work for men and women of any age!
 

How to make:
  • Die cut a scalloped oval in the front of a cream A5 card.
  • With the card landscape stamp, Dream, Hope, Cherish, Believe, Magical and Birthday (from Grand Word Perfect 2 stamp ref: 1803069a) onto the front of the card in memento rich cocoa, and distress the front of the card making around the die cut oval darker (put a piece of scrap paper inside the card while distressing ).
  • Next attach a piece of patterned backing card to inside front of the card.
  • Stamp the sofa twice onto brown card in black ink, and onto cream card in brown ink and the round cushion once more.
  • Cut out one full brown sofa and then the arms and back swirls from the second one. From the cream one cut out only the fabric part and colour the buttons brown, do the same with the round cushion.
  • Next attach the cream fabric part to the brown sofa, then attach the arms and back swirls, 3D gloss all the brown parts on the sofa.
  • Die cut 70th from brown card and attach it in the bottom left hand corner of the card and add 3D gloss.
  • Next die cut three brown fern leaves attach to the bottom right hand corner, with a fabric flower and a cream brad.
  • Finally attach the sofa to the middle of the oval and add some flowers and a present  on the sofa.

Saturday 15 December 2012

December Project Club - Cream and brown boat/lighthouse


How to make
  • Onto a 7x5 inch cream card using versamark, stamp the lighthouse in the bottom right hand corner, the boat in the top left hand corner, the ships wheel in the other two corners and fill the gaps with the other stamps and clear emboss the card.
  • Stamp the boat, lighthouse, anchor and a lifebelt onto cream card in memento rich cocoa, colour parts in using two shades of brown cut out and back onto kraft card, cut out leaving a very narrow border.
  • Shape the lighthouse and attach to the top right hand side of the card with 3D glue, shape and attach the boat centrally down the left hand side of the card with 3D glue.
  • Die cut two pilings (Sizzlits Coastal Set 38-9692) one in kraft card and one in cream card, cut the rope from the cream pilings and glue onto the kraft card pilings shape and attach using 3D glue to the bottom left hand side of the card so the top is in front of the boat.
  • Finally tie a piece of brown string to the lifebelt and anchor and attach the anchor next to the pilings and the lifebelt under the lighthouse.     

Friday 14 December 2012

December Project Club - Square Blue Boat


How to make
  • Stamp three lifebelts and two anchors onto white card in memento tuxedo black, colour in the bands on the lifebelts in red and blue and parts of the anchors, cut out the holes leaving the rest on the card and 3D gloss them.
  • Cut a 14.2cm x 14.2cm piece of pale blue hammer finish card, using memento London fog stamp the ships wheel in the top left and bottom right hand corners and the anchor and ropes in the other two corners, using a medium blue colour in the thin ropes, stars and the shaped parts on the ships wheel edge the card in the same blue, and distress with stormy sky.
  • Centrally attach to a 14.8cm x x14.8cm square white card.
  • Stamp the boat onto pale blue card in memento Paris dusk, using the same blue as before colour in parts of the boat, mount onto white card and cut out leaving a very narrow white border.
  • Centrally attach to the top of the card with foam pads.
  • When dry cut out the lifebelts and anchors and tie them on to a piece of string and attach to the card under the boat.

Thursday 13 December 2012

December Project Club - All Aboard


 How to make
  • Onto a piece of pale turquoise card in blue ink stamp “OUT AT SEA......” in three lines across the card, tear the card above the words and add diamond stickles along the torn edge.
  • Stamp the boat, lighthouse, two anchors  and the anchor and ropes onto white card in black ink, colour in the boat, lighthouse and two anchors and cut them out.
  • Next stamp the anchor and ropes onto gray and Kraft card cut the thick rope and star from the white card, the thin rope from the Kraft card and the anchor from the gray card, colour the star gray and reassemble as on the stamp.
  • Stamp “ On Your Retirement” (Grand Word Perfect 2 (Ref: 1803069a)) in black ink onto white card, cut it out so it’s about 8.5cm x 1cm edge with a silver marker pen.
  • Cover a 9cm x 3.5cm piece of white card with strips of ripped pale turquoise card.
  • Stamp the lifebelt into each corner of a 13.8cm x 13.8cm piece of white card and “All Aboard” along each side, repeat this on a 14.8cm x 14.8cm piece of white card.
  • Colour in the bands on the lifebelts in red and blue edge both in a silver pen, attach the smaller one to the inside of a 14.8cm x 14.8 cm twisted easel card, cut away the inside of the larger white square to make a frame, edge the inside cut edge in silver.
  • Onto the top half of a 14.8cm x 14.8 piece of white card attach a piece of pale blue card (leave about 1cm around the edge of the card.
  • Attach the lighthouse to the top right hand side of the card (so you can see part of it when the frame is fixed.
  • Stamp some flying birds in the sky, add the first strip of turquoise sea, then the boat and then the rest of the sea, glue the frame in place and attach to the easel card.
  • Using 3D glue attach the anchor and ropes to the bottom left hand corner
  • Finally attach the turquoise piece of card to the inside of the card, thread “On Your Retirement through the two anchors and attach to the turquoise card.

Wednesday 12 December 2012

December Project Club - Cream and Brown Lighthouse


How to make 

  • From a piece of A4 cream linen textured card cut a 13.8cm x 20cm piece stamp a background using all the stamps in memento rich cocoa, distress with tea dye and edge with a gold marker pen.
  • From the remaining cream card cut off a 20cm x 3.5cm piece and stamp the lighthouse in the middle and part of it above and below in rich cocoa.
  • On the remaining card stamp two lifebelts, two anchors.
  • Next stamp the scroll from Grand Word perfect 2 (ref: 1803069a) to the left hand side of the frame stamp "Ahoy" and "On Your" to the top with "Birthday" under on the right hand side, cut out and edge in rich cocoa.
  • Colour in parts of the lighthouse, the bands on the lifebelts and the loops and bands on the anchors, 3D gloss the anchors and lifebelts (I found it best if I cut out the holes and left the rest on the card and cut them out when dry).
  • Edge the lighthouse strip with a gold marker pen.
  • Cut two strips of brown checked ribbon 25cm long when the anchors and lifebelts are dry thread two anchors on one piece and lifebelts on the other.
  • Attach the ribbons to the top right hand side of the card on the back.
  • Attach the scroll 1cm down from the top of the card over the two ribbons.
  • Attach the ribbons to bottom of the card on the back, using 3D glue attach the anchors and lifebelts to the card.
  • Finally attach the lighthouse strip to the right hand side of the card.

Tuesday 11 December 2012

December Project Club - Black and white Lighthouse


The lighthouse stamp works so well with this style of card.

How to make
  • With black ink stamp the ends of the rope and anchor stamp across the top and bottom of a white DL card.
  • Stamp the lighthouse onto a 4.5cm x 13.5cm piece of white card in black ink, colour some parts of the lighthouse in black and gray.
  • Next cut into three 4.5 squares and mount onto three 5.5 black squares edge each black square with a silver marker pen.
  • Attach centrally down the card leaving a 1cm space between the squares.
  • Finally down each side attach a piece of black and white checked ribbon adding a dark gray card candi to each end.

Monday 10 December 2012

December Project Club - Blue and White Boat


I had so much fun coming up with ideas for Decembers Project Club cards, my problem was deciding when to stop!
 
How to make
  • Stamp a background onto a13.8cm x 20cm piece of medium blue card, using all the stamps (apart from the lighthouse and boat) in blue pigment ink and then clear emboss it.
  • Onto A5 piece of pale blue thin card stamp the lighthouse in the bottom right hand corner and the boat in the top left hand corner in blue ink, use the rest of the stamps to cover the card.
  • Next colour parts of the lighthouse corner in blues.
  • Then stamp the boat onto white card with blue pigment ink and clear emboss it.
  • Tear the lighthouse and boat corners from the pale blue card and attach over the corners on the medium blue card.
  • Mount this onto a 14.3cm x 20.5cm piece of dark blue pearl paper.
  • Attach four pieces of folded ribbon (blues through to white) to the top left hand side of the card with blue and white brads.
  • Then attach this to an A5 white card.
  • Finally cut out the boat leaving a narrow white border attach to dark blue pearl paper, cut out as before leaving a narrow boarder, using foam pads attach to the bottom left hand corner of the card.

Thursday 6 December 2012

Cake time....

A week or so back I was asked if I could make a cake for a friend, of course I said not thinking she meant she wanted it before Christmas!

Well, as you can see I managed and I am quite pleased with how it turned out!


Tuesday 4 December 2012

It's been a while...

Sorry its been a while, but I have still been crafting away!

I decided it was about time I got around to painting some of my ceramics. I am a big snowman fan, so painting these was an absolute pleasure!

 
This fella is about 10 inches tall!
 
 
This wreath is about 12 inches wide, I have a tree to match but I haven't started him yet!


Tuesday 20 November 2012

Happy Anniversary

I wanted a quick Anniversary card and Petal Passion just seemed to jump onto the stamping block! I had alot of fun making this one!


How to make:
  • The background for this card was made using some Dimension Stamps stamps and some artemio stamps, I randomly stamped them all over then distressed the background in aged mahogany.
  • I then backed onto burgundy card and mounted onto an A5 cream card.
  • Next I stamped the medium and small flowers from Petal Passion (ref: 2400065A) four times each onto cream card stamping the small three petal stamp in each petal of the medium flower and the three petals from the flourish onto the small flowers.
  • I then cut out, distressed and shaped them to make two flowers with two medium and one small flower and the last flower was made from two small flowers. I added a card candi to each flower.
  • Next I die cut some leaves and fern from burgundy and cream card.
  • Finally I arranged and attach the flowers and ferns to the bottom left hand corner of the card and added glitter glue to the flowers.      

Sunday 18 November 2012

With Deepest Sympathy

I wasn't quite sure what to do on this card, but I think it worked well!


For this card I used Petal Passion (ref: 2400065A) stamp set from Dimension Stamps.

How to make:
  • A dark grey pearl die cut was attach down the left hand side of an A5 white card.
  • Stamp four medium and small flowers from petal Passion onto white card in black ink.
  • Stamp the small three petal stamp into each petal of the medium flowers and the small three petals from the end of the flourish in each petal of the small flowers.
  • Cut out and shape make two flowers from two medium and one small flowers the last flower from the two small flowers, add a dark grey card candy to each flower
  • Next die cut three leaves from pale silver card scrunch up open out and distress with black soot, die cut five flourishes from black card,
  • Onto white card stamp “With Deepest Sympathy“ with parts of the flourish around it mount onto black card and attach on an angle to the dark grey die cut shape.
  • Finally arrange and attach the flowers, leaves and flourishes to the bottom left hand corner.

Friday 16 November 2012

Thinking of you

I wanted this card to be very simple but elegant and I think it work!


For this card I used The Luscious Lily (ref: 2400058) stamp set from Dimension Stamps.
 
How to make:
  • Stamp the small Lily in the bottom right hand corner of an A5 white card in black ink
  • Next stamp “ Thinking of You” (I am not sure where I got this stamps from!) across the corner above the Lily.
  • Along a piece of white card stamp three of the small Lilies close together, the middle lily being the opposite way round.
  • Trim down and edge with a silver marker pen and mount onto black card.
  • Attach down the left hand side of the A5 card.
  • Stamp six more of the Lily flowers,  cut out three full flowers and three with less petals, shape and decoupage onto the three on the strip of card.
  • Finally add three black card candies down the top right hand corner.

Wednesday 14 November 2012

Happy 60th Birthday

My daughters father in law recently celebrated his 60th birthday and as he is mad on fishing, so I decide to give his card a fishy theme!


How to make:
  • To make the background I randomly stamped any fishing and time stamps I had onto white paper in memento Paris dusk.
  • It was then distressed using chipped sapphire and trimmed to a 19cm x 19cm square, then mounted onto a piece of dark blue pearl card.
  • Down the right hand side  I attached two pieces of blue/white checked ribbon, and attached it to an eight inch square Kraft card.
  • Next I die cut the tall and middle sized shadow flowers (Spellbinders S5-066) and th from dark blue pearl card.
  • I then stamped three fish and 60 onto white card in Paris dusk, over stamp the 60 with stamps from the backing paper.
  • Cut out the fish and 60 distress with chipped sapphire and shape.
  • Stamp a fishing scene onto white card in Paris dusk and mount onto dark blue pearl card, attach the scene over the two pieces of ribbon on the right of the card.
  • Using 3D glue I attached the 60th below, the two shadow flowers to the left of the card with the three fish swimming through the flowers.
  • Finally I added a knot to the top of each ribbon and blue glitter glue to the fishes.

Monday 12 November 2012

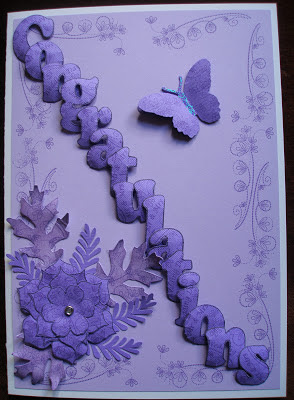
Wedding Card

My great nephew recently got married, its funny how time flies it seems like only yesterday he was playing in my garden, and now he is a grown married man! Congrats to him and his lovely wife.
 
Anyhow, enough reminiscing here's his (sorry) their card.


For this card I used the following stamps from Dimension Stamps: Petal Passion (ref: 2400065A), Uppercase Alphabet (ref: 2400050a), Lowercase Alphabet (ref: 2400060a), and the Grand Word Perfect (ref: 1803062a).
 
I also used Tim Holtz Tattered leaves 656927 Sizzix Die.

How to make:
  • Back the front of an A4 white card with a piece of lilac card leaving a 0.5 border all around.
  • Stamp the swirl from Petal Passion in Memento Grape Jelly around the edge of the lilac card.
  • Next stamp "Congratulations" onto a darker lilac card in Memento Tuxedo Black. In the letters randomly stamp "Wedding Day", "Mr and Mrs" from the Grand Word Perfect set and the swirl from Petal Passion in Memento Grape Jelly.
  • Cut out and shape the letters, then attach them to the lilac card with 3D glue, down from the top left hand corner to the bottom right hand corner over lapping the letters.
  • Using Petal Passion stamp the large and small flowers once, and the middle flower twice onto the darker lilac card in Memento Tuxedo Black, over stamp the flowers with the swirl in Memento Grape Jelly.
  • Cut out and shape the flowers, attach a silver crystal brad through all four flowers.
  • Punch or die cut four fern leaves from the darker lilac card and three leaves from light lilac card and over stamp with the swirl in Memento Grape Jelly, scrunch up open out and distress with Dusty Concord Distress Ink.
  • With 3D glue attach the leaves, fern and flower to the bottom left hand corner of the card.
  • Die cut two butterflies from dark lilac card over stamps the wings with the swirl in Memento Grape Jelly, shape the wings and glue together along the body and attach to the top right hand corner of the card by the body, and finally add lilac glitter glue to the body.

Saturday 10 November 2012

Thank You!

I needed a Thank You card and wanted to use the Dimension Stamps Octobers Project club stamp set. I think it worked quite well.


For this card I used the following stamps from Dimension Stamps: Paper Garden (ref: 2400045A), Uppercase Alphabet (ref: 2400050a), Lowercase Alphabet (ref: 2400060a) and Seasonal House (ref:1402037a).

I also used Elegant Flourishes 656639 die from Sizzix.
 
How to make:
  • Stamp the flourish from the Paper Garden stamp set down the left hand side and across the bottom of an A5 white card in Memento Elderberry ink.
  • Lightly distress with Dusty Concord Distress Ink, onto to a 15.5cm x 9.5cm piece of white card.
  • Stamp the house with bricks, the sun and pathway to the right hand side of the card in Memento Elderberry, stamp parts of the flourish from Paper Garden to each side of the house to look like trees, colour in using toning Promarkers.
  • Edge the card in the darkest colour, distress with Dusty Concord.
  • Stamp "Thank You" onto white card over stamp with the flourish in Memento Elderberry, cut out and distress with Dusty Concord shape the letters and attach using 3D glue - Thank going down to a piece of lilac pearl card over lapping the letters so it’s only 15.5cm long and "You" across another piece of lilac pearl card to fit under the house stamped card, when dry trim around the words.
  • Attach the house to the top right hand corner, "Thank" down the left hand side and "You" below the house,
  • Finally add some dark lilac flourishes and a fabric flower.

Thursday 8 November 2012

Sew Creative: Sewing Basket

What sewing room would be without a sewing basket, or in my case that basket which is full of all those bits that you don't know where they came from, or what they are off, but come in handy far to often!
Sorry about the picture!
 
This basket was made using Sew Creative stamp set (ref: 2400073a) from Dimension Stamps.
 
How to make:
  • Paint a round paper mache basket in white and the handle in lilac pearl acrylic craft paint.
  • Cover the outside of the basket in cream fabric.
  • Stamp eight cotton reels onto light tan fabric (which has no sew heat “n” bond attached) in black Verascraft ink, iron over the fabric paint with fabric paints iron after each coat of paint.
  • Stamp four buttons on coloured fabric in black.
  • Onto two strips of pink flowered fabric stamp five buttons and paint.
  • Narrow hem the two short sides and one long side, pleat each piece over the top edge of the basket and glue to the inside.
  • Line the inside of the basket in pink flowered fabric.
  • Cut out four cotton reels with needles and four without, glue the cotton reels one with and one without needle around the bottom of the basket, and a button resting on the one without needle.
  • Stamp “You have me in stitches!” in black onto pink ribbon glue onto the handle.

Tuesday 6 November 2012

Sew Creative - T-Shirt

I love the buttons on the Sew Creative stamp set (ref: 2400073a) I couldn't resist adding them to a plain t-shirt.


How to make:
  • Wash and iron the t-shirt put some card between the layers where you are going to stamp - this stops the ink going through to the back!
  • Using  black Versacraft ink stamp the heart and flower buttons around the sleeves above the hem, iron and paint using two colours of fabric paints - iron between each coat of paint.
  • Stamp five buttons in a row 2cm down from the neck seam, three in the row under and one in the last row paint as on the sleeves.
  • Stamp “You have me in stitches” twice above the first row of buttons so it starts and finishes in line with the edges of the buttons on the first row
  • In the space in the middle of the words put a row of dots in the colours of the buttons.


Sunday 4 November 2012

Sew Creative: Fabric Card


For this card I used up my left over buttons from the wall hanging!
 
 
For this card I used the Sew Creative stamp set (ref: 2400073a) from Dimension Stamps and a Tim Holtz die  called Sewing Edge (657829).
 
How to make:
  • Cover the front of an A5 white card with patterned cream fabric.
  • Stamp the metal manikin using black verascraft ink to the left hand side of the card and decorate with purple fabric stickers - a handbag, hat and a flower.
  • The five buttons were stamped onto coloured fabric and the solid manikin stamped onto pink flowered fabric  - Dont forget your no sew heat “n” bond
  • Paint the wood on the manikin in fabric paint.
  • Cut out buttons and a manikin.
  • Die cut Sewing Edge from light tan fabric and paint with fabric paints - iron after each coat of ink or paint.
  • Attach border to the bottom of the card and the five buttons around the top right hand corner.
  • Dress the solid manikin with a cream lace skirt and attach to the right hand side of the card.
  • Finally tie some ribbons, trims and wool in a knot and attach down the left hand side of the card.        

Friday 2 November 2012

Sew Creative: Wall Hanging

I just love the new stamp set from Dimension Stamps its called So Creative (ref: 2400073a), it is just fabulous!
So when Faye asked if I could do a couple of samples using fabric, the sewing machine was out in a flash!


To make this wall hanging I mainly used fabric paints, Autumn Leaf and Black Versacraft ink, just remember to wash and iron the fabric before stamping onto it.
 
I used No sew heat “n” bond to attach the stamped images onto the fabric. When cutting out fabric shapes attach the heat ”n” bond before stamping and iron between each layer of paint or ink.
 
Finally it is easier to cut the fabric into the desired panel sizes before stamping and painting, as you can get carried away and end up stamping in the wrong places!
 
For the lettering I used the Uppercase Alphabet set (ref:1801012A).

Wednesday 31 October 2012

BOO - Happy Halloween!

Happy Halloween everyone!


This card is made using the new Dimension Stamps stamp set called Sew Creative (ref: 2400073a) and Octobers Project club set - Seasonal House (ref: 1402037a).
 
How to make:
  • Cover the front of an A5 white card in blue fabric.
  • The leaf print background was made by using oak leaves (yes real leaves, I knew these mountains of leaves outside would come in handy!) and fabric paint - iron between layers of paint to fix it! 
  • Onto the blue fabric, stamp “on Halloween” and the spider from Seasonal House in black Versacraft ink over the leaves.
  • Next stamp the metal manikin onto the back round in black ink.
Attach no sew heat“n” bond to all fabric that is to be cut as it gives it strength and stops it from fraying!
  • Stamp two cotton reels and draw a pumpkin (big enough to look as if it fits the solid manikin)onto light tan fabric.
  • Stamp the solid manikin with spiders on the body onto cream fabric. Paint with fabric paints and cut out.
  • Also cut out a black fabric dress, two bats and a witches hat and die cut a black cat.
  • Using gold fabric paint stamp the spider onto the dress, hat and cats collar.
  • Attach the black dress to the metal manikin.
  • Add narrow ribbon to the back of the pumpkin and over the shoulders of the solid manikin , then glue to the background.
  • Finally add the two bats, cotton reels, cat and witches hat on top of the solid manikin.
Happy Haunting!

Tuesday 16 October 2012

October Project Club - Main Card


For this months Project Club I decided to make a Christmas card in the traditional Christmas colours. Below is a video on how to make this card.

For details on how to join the Dimension Stamps project club please visit the website.


Sunday 14 October 2012

October Project Club - Merry Christmas


This set of stamps seems to work in any colour combination. I just love working with creams and browns and couldn't wait to try it out.

How to make:
  • Stamp two holly leaves, the rectangle frame with “Merry Christmas” inside, the house with bricks and icicles onto cream hammer card in Memento Rich Cocoa, and two pine trees I used the Christmas Fir Tree stamp (ref: 0304075A).
  • Colour in with brown and cream Promarkers, cut out all the pieces and mount the "Merry Christmas" onto brown pearl card.
  • Cut a 13cm x 19cm piece of cream hammer card, place do not attach the house in the bottom right hand corner and stamp the flying santa and sleigh (I don't know its proper name!) so it’s behind the house.
  • Edge the card with a gold pen and centrally attach to a 14cm x 20cm piece of brown pearl card.
  • Attach a narrow piece of brown/cream checked ribbon across the top and down the left hand side of the card 4.5cm from the edge of the brown card.
  • Centrally attach this to an A5 cream hammer card.
  • In the top left hand corner attach the two holly leaves, the "Merry Christmas" in the top right hand corner, the two trees down the left hand side of the card the one next to the ribbon flat to the card and the other use 3D glue or foam pads, and the house to the bottom right hand corner with foam pads.

October Project Club - New Home number 2!


I really enjoyed making this new home card, it has a lovely wintry feel!

How to make:
  • Back a white stepper card with lilac paper.
  • Stamp the swirl from the Petal Passion stamp set (ref: 2400065A) down the tall side twice and across the bottom once in Memento Grape Jelly.
  • Also using the Petal passion stamp set stamp the medium size flower twice and the small flower once onto light lilac card in Memento Tuxedo Black, using the small three petal stamp and Grape Jelly stamp it to the top of each petal of the medium flowers, in each of the small flower petals use the three petals from the end of the swirl, cut out and shape the flowers.
  • Stamp the house with bricks onto light lilac card in Tuxedo Black, colour in with purple and lilac Promarkers and cut out.
  • Stamp “ New Home” using the Uppercase Plain Alphabet stamp set (ref: 2400050A) and  Lowercase Plain Alphabet stamp set (ref: 2400060A) onto a darker lilac card in Tuxedo Black.
  • Randomly stamp sold, bricks and the potted bush onto the letters in Grape Jelly, cut out and shape the letters.
  • Die cut two light and three dark lilac card pine trees (Sizzix Pine Tree 38-0179) and two leaves (Tim Holtz Tattered Leaves 656927) in light lilac card, stamp the swirl (from Petal Passion) over the leaves in Grape Jelly, scrunch up and distress in Dusty Concord distress ink.
  • Attach the bottom half of the trees to the tall stepper, put the house on but do not attach, stamp the path and sold sign in tuxedo black, stamp three potted bushes in grape jelly, attach the house with foam pads.
  • Attach the leaves to the left hand side of the card so one is just showing above the first step and the other goes up the left hand side of the card.
  • Using 3D glue attach "New" down the left hand side of the card to just above the lower step over lapping the letters if needed, and "Home" across the bottom to the right hand side.
  • Attach the flower to the bottom left hand corner with 3D glue add a purple flower button to the centre of the flower and a silver butterfly to the right of "New".

October Project Club - Blue Zig-Zag card


I wanted to make it look as if the houses were on a slope for this card and a Zig-Zag card did this perfectly. 

How to make:

  • Stamp four Christmas trees, three holly leaves and three houses with bricks and icicles onto light blue card using Memento Paris Dusk.
  • Colour in with blue Promarkers and a silver pen, add Diamond stickles to the windows and trees when dry cut out.
  • To make the backing paper I scrunched up and opened out a piece of white paper a few times, then rubbed over the open sheet with a light and darker blue ink pads, it was then photocopied so it was flat.
  • A white zig-zag card was made and a piece cut off to make each fold slope down from back to front.
  • Leaving a narrow border of white cut out and attach a piece of blue card to fit the first five sides of the card (not the back), leaving a narrow border of blue cut out and attach a piece of the backing paper to fit the three panels seen from the front of the card.
  • On the smallest panel without backing paper stamp “Merry Christmas” in the centre and the holly leaves in each corner in Paris Dusk.
  • On the other panel without backing paper stamp a Christmas greetings with the holly leaves in each corner.
  • Attach a house to the top right hand side of the back backed panel, stamp the pathway in Paris dusk from the door, add some holly leaves to the bottom corners and two of the trees along the path way, to the middle backed panel attach the house the top left hand side of the card stamp in the path way add a tree to the right and some holly to the bottom corners, using foam pads attach the house to the right hand side of the card with the tree to the left hand side of it.