Tuesday, 20 December 2011

Happy birthday and an ATC

ATC

With the help of a die cut pencil and bulldog clip I made up a clip board, from a few of the drawing sheets cut up and folded, then glued to clip board with some of the corners curled up and a coffee ring or two (made by inking up a pen top) it looks well used, mounted onto green card.

 Green Easel card

Onto a piece of 13.8cmx13.8cm pale green card randomly stamp the words Gear up for a Celebration and the two small gears and components stamps, in memento rich cocoa ink, also ink around the edge of the card, attach centrally to a piece of 14.8cmx14.8cm square dark green card.

Onto another piece of 13.8cmx13.8cm pale green card, just use the two small stamps and stamp around the sides of the card only, ink around the edges.

Stamp HAPPY BIRTHDAY onto a piece of pale green card, ink around the edge, mount onto dark green card,

Using black stazon ink on silver card stamp four spanners and cut them out, (June 2008project club)or use die cut ones.

I used Spellbinders Sprightly Sprockets S5-048 and cut three of the smaller ones out from silver card, attach them to a piece of dark green card with green brads and added two of the silver spanners, mount this onto silver card and attach to the bottom left hand corner of the mounted pale green card.

Using a 14.8cmx14.8cm dark green folded card have the open ends facing you, and score from the top left hand fold down to the bottom right hand corner of the top piece, attach the front of the card to the left hand triangle only with the sprockets up to the fold of the card.

Centrally attach the other stamped pale green card to the inside of the card, using foam tape attach HAPPY BIRTHDAY across the bottom left hand corner with the two spanners into the corner.

Geared-up birthday!

With stormy sky distress ink I brushed over a mask of clocks and gears (Creative Expressions) on to a piece of 13.8cmx20cm pale blue card, attach centrally to a folded dark blue A5 card. Onto a piece of silver pearl and dark blue pearl card with black stazon ink stamp the large gears twice and HAPPY BIRTHDAY once also stamp HAPPY BIRTHDAY onto a lighter shade of blue pearl card.

Cut out the gears from the silver card you will need one full set, and just one large and small from the other the other set, three sets of hubs from the dark blue card, shape and attach to the silver gears with 3D glue.

Cut out the letters from the three colours that you will need to say HAPPY BIRTHDAY DAD, it will be six from one and five from the other two.

From some black self adhesive fab foam cut some circles the teeth smaller than the gears you will need three of each size, stick them to the gears and attach the full set of gears with glue almost to the top right hand corner, and the smaller set a third up on the left hand side with the large gear to the side.

Glue some navy wool or cord around the gears this only needs to be glued to one gear.

Take a piece of pale blue pearl paper 6cmx7.5cm , down 6cm sides score two lines 0.5cm apart and one at the bottom, down the sides fold the first score line to the front the next to the back, fold the bottom one to the back.

With black stazon stamp gear up for a celebration onto this and attach to the bottom right hand corner by the 0.5cm edges it should look like a paper bag.

Attach HAPPY BIRTHDAY to the wool and card I used Hi-Tack glue and DAD falling into the bag.

Black and white Birthday

Onto a piece of 9cmx20cm black card using a clear embossing pad, stamp the two small gears and components stamps around the edge of the card and emboss with clear embossing powder.

Stamp “HAPPY BIRTHDAY” with memento tuxedo black ink onto a 3cmx7.5cm piece of white card, with the two small gear stamps and the words only from the large one (gear up for a celebration) stamp them randomly , with black ink onto a piece of 7cmx18cm white card.

 Attach the white card centrally to the black card, fix a piece of black 4cm wide ribbon on an angle down from the centre right hand side to the left hand side, now attach this to a white DL card.

Fix a black brad to each side of HAPPY, using foam tape attach it to the ribbon, put a die cut 50 in the bottom right hand corner. It’s so quick and easy, you can adapt it to any size.

Hap-gear birthday!

Using burgundy ink and the large gear stamp, randomly stamp it over a piece of 14cmx14cm square cream card. Lightly distress with aged mahogany ink, mount this onto green card with a narrow boarder then attach centrally to 14.8cmx14.8cm square burgundy card.

Stamp “HAPPY BIRTHDAY” onto cream card with burgundy ink, distress as above trim down and mount it first onto burgundy card then onto green, attach in the bottom right hand corner of the card.

With black ink stamp the large gears onto burgundy card, when dry cut it out in one piece attach to green card, cut out so you can see a small amount of green around the gears.

Fix green buttons over the hubs with cream stranded cotton (you may need to make the holes with a pricking tool first), attach a small piece of cream card under the buttons so it looks like the hubs on the stamp attach to the card.

Thursday, 6 October 2011

Snow is falling


I wanted to put this house into a Snow globe but could not find the stamp; instead I used the Christmas bauble from the Project Club October 2007.

The Christmas bauble was stamped onto a piece of 13.8cmx13.8cm white card using memento Paris dusk, the centre was cut out, colour the leaves and holly in using blue promarkers, silver gems were used for the holly berries, emboss Sizzix 656939 Tim Holts tall pines to each side of the bauble, chalk or distress the pine trees in light blue, with a pencil lightly mark the edge of the bauble onto another piece of 13.8cmx13.8cm white card, using the pencil marks as a guide stamp the house in Paris dusk, colour this with blue promarkers and gel pens, add silver glitter glue to this and the embossed pine trees, when dry glue the bauble onto the house card just on the outer edge, mount this onto a piece of silver holographic card, stamp snow is falling all around us on white card in Paris dusk cut it out and mount onto silver holographic card, onto a piece of 14cmx14cm light blue card stamp the house four times have the card in front of you like a diamond and put one in each corner.

Have a 14.8cmx14.8cm folded white card in front of you with the fold away from you, score from the top left hand corner to the bottom right hand corner of the front of the card, attach the light blue card to the inside of the card which is not scored, fold the front of the card along the scored line to the inside of the card, have the card in front of you with the fold to the left hand side, with strong double sided tape or glue, attach the front of the card to the bottom triangle only to make a twisted easel  card, tape or glue the snow is falling card to the blue to keep it open.   

Black and White Snowflake


With memento black tuxedo stamp the snowflake word stamp onto a piece of 11.5cmx10.3cm white card with a silver pen edge the card, stamp peace in the bottom right hand corner, using the Sizzix 656920 die Tim Holtz on the edge Snow flurries cut the top and bottom of a piece 13.8cmx19.5cm black card, edge the two straight sides with a silver pen. Attach this centrally to an A5 folded white card, in the top left hand corner stamp joy and Noel in the bottom right hand corner, using foam pads or glue attach the white snowflake card to the black card line this using the sides as the black snowflake edge is uneven, fix a silver snowflake to three of the corners leaving out the one with peace in.

Twas the Night before Christmas


Onto a piece of 12.8cmx18.5cm white card emboss the sizzix 656939 Tim Holtz tall pines in the top left hand corner, distress the card with dusty concord (I used a stencil brush to get a softer look), in the top right hand corner stamp the Santa and sleigh in dusty concord, in the bottom centre stamp Twas the Night before Christmas (Christmas words 0301040A) with memento grape jelly, mount this onto purple foil card and attach centrally to an A5 folded white card, stamp the house onto a piece of white card using grape jelly cut this out and distress  with dusty concord, mount this onto purple foil card and cut out, attach with foam pads or glue above Twas the Night before Christmas to the right hand side of the card, add purple glitter glue to the embossed pine trees , windows, doorway and pine trees near the house, in each attach a purple card candi.

Blue Snowflake

Distress the front of a white 14.8cmx14.8cm square card with stormy sky distress ink, using the largest of the three small snowflake stamps, with stormy sky distress ink stamp this around the edges of the card, onto a piece of white card stamp the large snow flake word with memento Paris dusk, cut it out and go around the edge with a blue glitter pen also colour the stars, cut out the large eyelet square from the nestabilities set S4-305 in a dark blue pearl card, attach this like a diamond to the centre of the card using foam pads or glue, fix the snowflake to the blue diamond so that one of the lines of Seasons Greetings lines runs from side to side of the diamond.

Cream Noel

Onto a piece of brown wrapping paper randomly stamp the word snowflake to cover the paper using memento rich cocoa, stamp the house onto a piece of cream card using rich cocoa and cut it out, distress and go around the edge of the house using brushed corduroy distress ink, colour the windows in with a yellow promarker and the trees in a green promarker, now go over the windows with some gold glitter, mount this onto gold card and cut it out.
Cut a piece of cream hammer card 12.8cmx19cm mount this onto gold card, tear a piece of the stamped brown paper to fit this attach to the cream card, secure a piece of red ribbon around the middle of the card, attach this centrally to an A5 folded cream hammer card, using foam pads or glue attach the house over the centre of the red ribbon and stamp Noel in rich cocoa on the brown paper in a space left between the snowflakes.

ATC.

Tear apiece of the remaining stamped brown paper longer than the ATC card, roll the bottom end up so it fits on to the card, using the two small snowflake stamps, with the rich cocoa ink stamp each one onto cream card and cut them out, now cut out another snowflake to match and stamp a snowflake on them, glue a narrow piece of red ribbon to the blank side of one of each size of snowflake and cover with the one to match, put a bit of glue to the inside of the rolled up end of the brown paper, now onto this stamp Noel, Joy and Piece in rich cocoa, attach the ribbon so it hangs over the top of the paper this can now be attached to the ATC card.

Tuesday, 23 August 2011

Twisted Easel Card


Take a folded 14.8cmx14.8cm square card and 14.8cmx14.8cm square piece of card, put the folded card in front you with the fold away from you, score from the top left hand corner to the bottom right hand corner of the top piece only. 

Cut two pieces of green card 13.8cmx13.8cm square and two pieces of yellow/green backing paper, mount this centrally on to the green card then mount one piece onto the 14.8cmx14.8cm piece of white card, the other piece attach centrally to the inside of the card which has not been folded.

With memento tuxedo black stamp large flower twice onto two shades of orange card, shade the centre and part way up the petals of each flower with vintage photo distress ink, stamp the large flower once onto four shades of green card.

Cut out the four green ones with leaves and the orange flower heads only, glue an orange flower to each green one, attach three flower to the single 14.8cmx14.8cm card, with the folded card in front of you with the fold to your left, put glue/double sided tape on the bottom triangle only attach square to this, turn the card so the fold is away from you open up the card and fold back the left hand corner, attach the last flower to the bottom left hand corner of the inside of the card with foam pads or glue.

          Elegant Lady

 Onto a square white pearl card using memento tuxedo black, stamp the eyes nose and mouth only, (from the flower power set of stamps), cut out a very simple hat shape in black card, shape this and attach to the card with foam pads or glue just over the right eye, stamp the large flower twice onto pink card with black ink, cut out one with the leaves and one just the flower head only, curl up the petals on the head only shape the leaves down on the other, attach to hat with foam pads or glue,

Stamp happy birthday in the bottom right hand corner with black ink.

Cream and Brown Thank You


As august is a busy month for me with family celebrations I was using the flower stamp a lot, so rang Faye to see it was available in a larger size, a few days later it arrived in the post, Thanks Faye.


Using antique linen and brushed corduroy distress ink randomly stamp the small flower, onto a piece of cream leather look card, with a stencil brush lightly go over this with antique linen, stamp the large flower onto a piece of pale gold pearl card using dark brown pigment ink, clear emboss them, cut out the brown one but only the flower head from the pale gold card, glue this to the brown flower, cut apiece of brown card 16.6cmx11.6cm and a piece of the cream stamped backing card 16cmx11cm go around the edge of the cream card with brushed corduroy, attach this centrally to the brown card and then centrally to a 7”x5” pale gold card, glue the flower to the top left hand corner and stamp thank you in brushed corduroy,

         Pink Quick and Simple 

Using a black pigment ink stamp the large flower once onto black card, and twice onto pink card clear emboss them. Cut out the black flower but only the pink flower heads, flat glue one pink flower to the black one, curl up the petals of the second pink one and glue onto the other one, cut a piece of black card 16cmx8cm and a piece of pink card 15cmx7cm attach the pink card centrally to the black card, glue some narrow white/silver ribbon 2.5cm in on the back from the top left hand corner go around the bottom right hand corner and back up to the top left hand corner, hold this in place on the back with some glue or double sided tape, attach this 1cm up from the bottom of a white DL card, shape the leaves down on the flower using glue or foam pads glue to the top left hand corner of the card, with a silver pen go around the edge of a white and black die cut tags, onto the white one in black pigment ink stamp happy birthday and clear emboss it, glue this to the top of the black tag with some of the black showing, using the white/silver ribbon tie them to the ribbon on the card and hold in place with a foam pad.


Lilac Get Well Soon and green Happy Birthday


These two cards are almost the same as the lilac happy birthday only I did not cut around parts of the flower just stamped more flowers and decoupage them to hold the embossed in place.

Scrap Box Bits


I have boxes of bits of card, and folded cards from old kits, the embossed A.T.C. made me think about using some up, no two cards will ever be the same.


    Blue Congratulations

Onto a piece of white card using Versa mark, stamp the flower and congratulations, clear emboss this, with stormy sky distress ink and a stencil brush, working from side to side keeping the outer edge almost white, but over the flower and congratulations needs to be quite dark so it will stand out, go around the edge of the card with black ink, using pieces of blue and navy card that tone with the stormy sky ink, scrunch up the navy card open it out and rub over it with a sanding block, now attach them to a white card starting with the navy twist each piece so each colour can be seen under the embossed card.

       Green Happy Birthday

I found a white card with a piece of green card mounted onto it almost the same colour as pine needles distress ink, stamp the flower and happy birthday using versa mark and clear emboss it, colour as above with pine needles and go around the edge with black ink. A lighter piece of green card  was scrunched up and opened out, and rub over with pine needles ink, attach the light green and white card in place, fix a light green card candy to each corner.

         Lilac Happy Birthday

A 7”x5” lilac folded card was used as the base card, onto a piece of white card about 1.5cm smaller than the base card, using memento tuxedo black stamp a flower in each corner, with the two leaves and curled petals, facing into the centre of the card, lightly colour this with dusty concord distress ink, edge the card with black ink, cut a piece of white card to fit just over the curled petals stamped on the white card, on to this stamp the flower and happy birthday using versa mark and clear emboss it, working with stormy sky distress ink in the centre over the words and part of the flower, and dusty concord to the edge both colour need to be quite dark, edge the card in black ink, using a craft knife cut around the two curled petals and part way along the two leaves, you will now have slots to slip the corners of the embossed card in, make sure the embossed card fits before you attach it centrally to the base card.  

Saturday, 6 August 2011

ATC cards

The cake ATC was made using versa mark ink and clear embossing powder, on white leather look card.

‘It’s a piece of cake’ was stamped across the bottom, with the cake on a plate just above it to the left, mask of the cake, and stamp the big cake just to the top of the plate.
Go over the whole card with distress vintage photo ink, edge the card with memento rich cocoa ink.   

The ring ATC was made using pale gold pearl card, cream lace was glued to the back of a small brown nestabilities shape, stamp the rings onto a piece of gold card using black stazon ink, stamp ’To have and to hold’ onto some pale gold pearl card in memento rich cocoa ink, cut this down to3.5cm x 3cm

Round of the corners and edge it in rich cocoa.

Cut the rings out and shape them, with a foam pad fix them to the bottom left hand corner of the brown shaped card, and the ‘To have and to hold’ to the right hand side.

Celebrate black /red and white

In my scrap box I found this backing paper which just fitted an A5 card, with 3cm folded to the back of the card.

Onto a piece of red card 14cm x 10cm, in memento tuxedo black ink, stamp the piece of cake on the plate, in the bottom left hand corner, next to this stamp ‘It’s a piece of cake’, above ‘piece of’ stamp celebrate , attach this to piece of silver card 14.5cm x10.5cm.

Stamp the heart cake, one extra flower from the top of the cake, and a heart big enough to cover the bells, on to white pearl card using memento tuxedo black ink.

Colour the leaves and centre of the flower in ice gray 3 or black promarker, colour the ribbon, heart and flower, the top edge of the cake in a red gel pen. I also drew three red lines at the bottom of the cake, colour the cut part of the cake in terracotta promarker.

Cut out and shape the cake, heart and flower, attach the cake centrally to the top of the silver/red card, fix the heart over the bells with a foam pad, attach the flower in place, fix a clear crystal gem to each corner of the red card and one on the ribbon.

Attach the silver/red card across the middle of the card.

50th Anniversary card

With vintage photo distress ink, lightly cover the front of an A5 hammer finished card, down the side of the card stamp congratulations in vintage photo ink.

Roughly tear a piece of brown card to fit down the folded side of the card, attach some gold chiffon ribbon to this and attach to the folded side of the card, place a cream card candy, to the corners of the brown down the folded side.

Stamp the heart cake, one extra flower from the top of the cake, a 5 and 0 onto some cream pearl card, using memento rich cocoa ink, go over the5 and 0 with the edge of the cake to give it some pattern.

Colour in the bells, ribbon, leaves, centre of the flowers, and the top edge of the cake with a gold pen. Cut out and shape the cake, flower head only, 5 and 0.

Onto a piece of gold pearl card 9cm x 13cm, stamp Anniversary in the middle at the bottom of the card, just above this to the right, stamp th.

Attach the cake to the top of the gold card, and the 50 just above Anniversary.

Black and white wedding stationary

Using white pearl card and memento tuxedo black ink, stamp two of the large flower, the rings and the round congratulations.

Colour in the rings, both centre of the flowers but only one set of leaves using ice gray 3 promarker. Cut out the round congratulations, and colour around the edge with the gray promarker, cut out the rings, the flower with the coloured in leaves, and just the flower head of the other one, shape the flowers and rings.

Cut a piece of silver pearl 7cm x  5.5cm, and a piece of black card 6.5cm x 5cm, attach the black card centrally onto the silver, glue the flower  with the leaves onto the congratulations, glue the flower head on, using a foam pad place the over lapping the flower, attach this to the silver/black card.
This can now be used for invitation/thank you cards, gift bags and lots more, for the place card just make the backing card smaller, for the order of service you will need to make a silver/black  band to go around the roll of paper.

Monday, 13 June 2011

A table by the window please


Stamp the lady onto some dark cream card using black ink, and colour her in, on a piece of stone and brown card stamp the doorway in black ink, cut out the panels on the brown doorway only, now cut out around the door, on the solid line which is the top of the step, with a sharp knife cut across the top and bottom of the next line in, and down the centre of the door, score down the sides so they can be opened.

Cut away the inner door from the stone card, and glue the brown door onto the stone frame just above the step.

Place the lady behind what has now become a window, when this is dry cut out around the stone window frame.

I embossed some light gray card with a brick design, coloured this in using distress ink :- fired brick and vintage photo, trim this down to 17.5cm x 12.5cm, back this on to a piece of lilac card 18.5cm x13.5cm, now attach this centrally onto an A5 white card.

Attach the window to the top centre of the brick work, punch out some leaves and flowers to go up the sides of the window, add glitter glue to the flowers.


The black and white card was made the same way, only the position of the window was changed, and it only needs leaves and flowers up one side of the window, in the space under the window, you can put a backed greeting of your choice.

Cake anyone?

Fold apiece of A5 pink card in half, draw round the top 10cm of the coffee cup, cut this out and round off the bottom two corners.

From a piece of thick handmade white paper, two shaped tops were cut out about 11cm x 7cm in size, attach one to the front and back of the card so that they match, stamp “lets meet for a drink” onto white ribbon using black versacraft ink and heat set this, a slit was made half way up the pink card for the ribbon to go through, this was attached to the inside of the card as was the other end of the ribbon.

Punch out two black leaves and glue to the top of the card, punch out about twenty small pink flowers, place two of the flowers onto the ribbon, following the bottom shape of the white paper, put a row of pink flowers, add some flowers to the leaves, to the centre of each flower add some black glitter.

This would make a good card topper too.

More cups


As Fathers Day is just around the corner I made two cup cards with that in mind.

The cheeky party invitation was made without the wrap, and as it will be a cold drink it has stars on top of the liquid, to give it a bit of a fizz.

Disposable coffee cups

As the coffee cup template I used with the shrink plastic on the ATC, looked about the right size to make cards with, I thought why not give it try.

On a piece of A4 card make a fold 11cm in on long side of the card.

Place the cup template to the fold and draw round this, cut it out, place the oval shaped top onto the front of the card, draw round the bottom to make the top rim of the cup, move it down about .5cm , and draw round the top until you meet the rim line, this is now the liquid level.

Both wraps can be cut out of a piece of A5 card, the lady fits on the small one, the doorway on the larger one.

Place the wrap template to the fold and draw round this, cut it out, using a darker shade of ink stamp lady/doorway in the middle of it, using a promarker in the same colour as the ink, draw some dots or small line at the top and bottom of the wrap.

Draw round the top rim of the cup with the pro marker, stamp “ lets meet for drinks” under this ,with the promarker put dots or small lines to each side of this ,at the bottom of the cup “coffee” two or three times,  in between put dots or lines, with a brown promarker colour in the liquid part, draw round some heat swirls, and glue them on to the liquid, using double sided tape fix the wrap to the cup so it over laps a bit.   

A portait of a lady

A square white card was used to make this card, I cut a piece of pink backing paper 1cm smaller than the card, then attached this centrally onto the card.

Using nestabilities (set s4-305 eyelet square), cut out and emboss the largest one in purple, do the same with the next size down only in a pale pink, make a mask to fit this, so only the centre raised square can be seen, with this in place, in purple ink, stamp as much of the lady that can be seen, colour in the hat, bag and dress frill in purple gel pen.

Attach this in the centre of the purple square, to the top left hand corner attach a white chiffon bow, glue one of the purple cut out circles to the bow ,and 3D gloss it (why waste them).

Using foam tape or pads on the back of the purple square, fix this centrally onto the card.

The cream card is made almost the same as the white card.

As its made into an easel card you will need, an extra piece of cream card the same size as your card, and backing paper, using the extra piece of cream card, make this up as the purple card only using cream and brown, miss out the part on the ribbon and purple circle.

Cut out and emboss the smallest square in cream, and the next size up in brown, make a mask to fit the cream one so you just see the raised square, with this in place, ink up only the word “with” stamp this to the top of the square, now do the same with the word “love” in the space left (it just fits), colour the raised dots in brown, attach this to the brown square.

Working with the folded cream card, fold the front in half to the inside of the card, to form the easel, attach the second piece of backing paper to the inside of the card, cut a piece of cream card 3cm x1cm smaller than the backing paper, using foam tape or pads attach the brown square, to the centre of  this.

Have the open ends of the card facing you, put double sided tape on the bottom half of the card only, take a piece of cream card with the lady on, making sure you have the lady facing  you, attach this to the card, now take the strip of cream card and using foam tape, attach this to the inside of the card ,so brown square is about 1cm inside the card.

Now just add a flower to the bottom left hand corner.

Monday, 6 June 2011

Quick and simple

There are times when we need a card in a rush, this one takes no time at all. I used black and white, but just think of all the colour combinations and greetings you could use for yours.
Using a 15cm square white card, I stamped ‘Let’s meet for drinks’ in black ink around the side edges to create a border.

The lady was stamped onto some additional white card, again in black ink, and using a black gel pen I enhanced some of the features by colouring them in.

I cut around the lady and edged it using a silver pen. Then I mounted this onto a piece of 10.5 square black card using silicon glue or foam pads. The black card could then be mounted onto silver card, but I used the silver pen around the edges to give the same effect. This is then attached to the centre of the card.

4 small flowers were punched from black card and one was placed in each corner of the card, with a clear Gem added to the centre of each.

This looks good if you have time to emboss the lady!

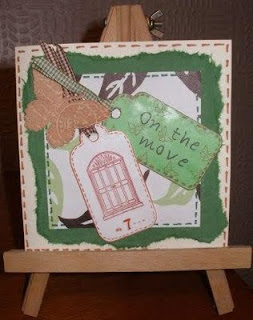
On the move

With a shrink plastic tag that was leftover, I came up with this card.

From a piece of thick, handmade green paper, I ripped a square to fit onto a cream square card.  

A square was cut from patterned paper, roughly 2cm smaller than the torn square and around the edges added a running stitch effect using a dark green promarker.  I mimicked this around the edges of the cream card with a brown promarker pen.

Using a sizzix die, a tag was cut  from green card, decorated by stamping small butterflies and adding the running stitch around the edges in brown to match the card. On the tag, I stamped ‘On the move’ using crystal tips and black ink.

The finishing touches to the card included adding coordinating ribbons to the tags and a Cuttlebug butterfly, which was shaped to lift the wings from the card.


ATC's

As the stamps are quite large, I had some fun time with shrink plastic. The first tag turned out way too small, but I got there in the end. The template ended up approximately 19.5 x10.5 cm, then shaped at the top and rounded on the corners.

Draw around this with a brown permanent pen onto white shrink plastic, cut this out and stamped the doorway in rusty brown Stazon, making small running stitches just inside the brown outline with the brown pen. I put a number on this but can leave this out. This is where the fun started I had to keep on turning it as it was so large.

 I backed an A.T.C. card with white and green paper, using a dark green promarker put a border of small running stitches to match the tag. Attach a brown ribbon to the tag glued it to the card.

The lady one was made in the same way

New Home

I wanted to make some cards that specifically used the door stamp and came up with a ‘New Home’ idea.

On a 15cm square white card, using black soot distress ink, colour in the bottom 3cms of the card to create the driveway. Then using fire brick and brushed corduroy distress ink colour in the rest of the card, working from side to side to give the effect of a wall.

Stamp the doorway twice, once each on a stone and brown coloured card using black ink. Cut out the stone card, cut out the full doorway, then from the brown card cut out just the doors and attach to the stone doorway. Stick the doorway off centre to the right of the card, leaving enough room for a greeting in the top left corner.

I used the planter and wellies stamps from April 2008 Project Club, and the tree from September 2009 Project Club to decorate around the doorway, however you can use whatever you have available. I added 3D glaze to the wellies to make them shine like new.

Don’t forget to add a greeting; this could be a banner, a plaque or just a mounted greeting.

The Dad card it is almost like the New Home card, only it’s on an A5 Cream hammer finished card to add texture to the stone wall. (I thought I had a stone wall mask, but could I find it while making the New Home card, oh no. It turned up a few days later, so I thought I could turn the New Home into a Father’s Day card). I used antique linen, wild honey, vintage photograph and brushed corduroy distressed inks over the stone wall mask to create a lighter coloured wall.

The letters were stamped onto green card using black ink. Once dry I then stamped over the letters with parts of the doorway, in a brown ink, these were cut out and shaped. After attaching them to the card, the letters were then 3D glazed.

Thursday, 21 April 2011

The sun

The early morning sun  inspired this card and it was so quick to make.

I used a 15cm square pale blue card for the base card and stamped on a few birds in one corner. I then stamped the road map in brown ink on parchment paper. On lime green card I stamped enjoy the journey in a darker shade of green ink and cut it out.

To make the sun I ripped a large orange circle and a smaller mustard one (almost as big as the card). I embossed them using a Tim Holtz embossing folder and then cut them down to fit in the left hand corner of the card and stuck them in place.

I folded the map and stuck it to the card. Finally I stuck on the enjoy the journey on top of this.

How quick was that!

Wish you were here

Just like the Jungle card I have previously listed this card was made by using up bits of paper I had left over.

To make it I used a mountain fold card in light blue, making the main panel 13cm wide. I then cut a piece of navy card 11cm by 13.5cm and stuck that in place. On the navy card I stuck a plane and the bagage car.

I then stamped enjoy the map in blue ink on some parchment paper and scruched it up and folded it so it fitted on the first "mountain" on top of that I stuck a suitcase. In a darker shade of blue ink I stamped enjoy the journey on a light blue card cut this out and backed it onto navy card.

On the second "mountain" I stuck another suitcase, tag and passport. I then stuck enjoy the journey with a word on each "mountain".

I now think the "Mountain" section of this card would make a great card on its own!

A step back in time

I recently got a set of alchol inks and I couldn't resist having a play with them, especially when I saw these stamps.

To make this card I first embossed a piece of silver foil with the Cuttlebug cog embossing folder, then I used red, blue and yellow alcolhol ink with a bit of blending solution to ensure it didn't turn out to bright, and inked the foil until I was happy with the effect.

On a piece of silver matt card I stamped the car in black ink. On red card I stamped enjoy the journey again in black ink. I cut both of these out. Then with the remaining red card I cut out a scalloped circle and two strips, which were cut to a point at one end, These were then outlined in a silver marker pen.

To construct the card I backed the foil onto red card and cut it out leaving a small border, I then folded a A4 piece of plain white card in half and added the foil to this. I then fixed the two red strips and circle on top of the foil. Placing the car in the circle and enjoy the journey on the strips.

Saturday, 16 April 2011

In the Jungle......

the mighty jungle (sorry I couldn't resist, I just love that film!)

I had these bits of paper left over from a card and some scrapbook pages I had previously made, and I thought they would work so well with the enjoy the journey stamp.

It was worth having a rummage through my bit box, I had forgot about these papers.

ATC Clipboard

To make this ATC I cut dark blue card 5cm x 7.7cm and rounded of the corners. I then cut four pieces of light blue paper 4.5cm x 7cm. Across the bottom of two of the light blue pieces I stamped one with London, and the other with Paris, in a toning blue ink. On the third I stamped New York, and finally on the fourth I stamped enjoy the journey.

I then stuck the four pieces of card together along the top edge only putting enjoy the journey on the top. Then attached the "note pad" to the "clipboard", then stuck them onto an ATC card.

Using my Sizzix I cut out the clip and a pencil, and fixed them to the clipboard, attaching the pencil to the top page only!

Monday, 11 April 2011

Enjoy the journey

This card seems to have a very masculine feel, but I am sure with different coloured inks/papers it would be fine for a lady too...


To make this one I used a 15cm by 15cm white card for the base card. I then cut a 13.5cm by 13.5cm square from some pale blue pearl card, and stamped the road map about 2cm from the top of the card in black ink. I then edged the pale blue card using a silver marker pen and stuck it to the base card.

In the same pale blue pearl card I stamped enjoy the journey, but I stamped it first onto a scrap piece of paper then without re-inking it I stamped onto the pale blue card, I did this to get a worn effect. I then cut out each word and edged them in silver marker pen. The words were then stuck under the road map.

On the pale blue card I stamped the word travel. On a small piece of pale green I stamped the open topped car and finally on a piece of darker blue coloured card I stamped the other card. I then cut all these out and edged them in silver marker pen. I then stuck them over themselves on map that was stamped on the 13.3cm by 13.5cm card.

A travel bag

When I started using these stamps I just couldn't get the idea of making a bag out of my mind, these stamps are just perfect!

To make the bag I cut a pocket out of some material I had and stamped the map and enjoy the journey in Versacraft Black ink, once stamped I heat set them to ensure they would be permanent.

Onto three scraps of different materials I stamped the words Paris, London and NewYork I then backed them onto Heat'n'Bond and then cut them into tags (I used my Sizzix for this). I then placed them on the pocket and ironed them into place. To ensure they would not move I stitched around the edges of the tags in a tan coloured thread and stitched a cord on there too.

Once I was happy a sewed the pocket onto a calico bag with my sewing machine.

Now think of all those plastic bags I will save on!

Pocket Galore!!!

These two cards are perfect for my friends who are going to be taking a gap year!
To make the burgundy card I started with an A4 piece of card and folded it in half.

I then choose a piece of pink card and cut out a handbag shape that was almost as big as the folded card (you can use any handbag shape or template you have). Stamp the road map stamp all over the handbag in burgundy ink, and then make small stitch marks around the handbag in burgundy pen. To finish off the handbag cut a pocket to fit on the front and stamp in burgundy ink, Paris, New York and London.

On another piece of pink card, stamp the road map so that T of travel has some plain card next to it even if this mean the whole stamp doesn't fit on the piece of card. This needs to be cut into an 8cm by 2.2cm strip with a point at the end of the word. Add stitch marks around this to, this tag shape then forms your bag fastener.

Stick the pocket to the front of the bag. Attach the pointed end of the fastener to the pocket with a brad, fold it over and stick it to the front of the bag.

To make the bag charm I used some ribbon, beads and a charm I had lying around, I fixed it to the handbag, and stuck the handbag to the front of the card.

The blue card was made by folding a piece of A4 blue card in half and stamping all over the front of the card Paris, London and New York in blue ink.

I then cut out a pocket shaped like those found on a pair of jeans and stamped the road map in black ink on it. Then around the edges of the pocket I put two lines of stitch marks (again just like a jeans pocket).

The pocket was then fixed to the bottom of the card using brads.

On a light blue piece of card I stamped enjoy the journey in a darker blue ink. I then cut around each word and stuck it onto the bottom of the card using foam pads.

Finally I cut out three tags in different shades of blue and stamped London, Paris and New York on them, I then attached blue ribbon to each one and fixed them inside the top of the pocket.

All done!

Friday, 8 April 2011

Where does the time go....

Boy this last month has just flown by, I have been so busy.

Firstly I had relatives over from the states it was so lovely to see them and get to spend some time with them.

It was also costume time again, My youngest dances, and it was her dance show this last month so I had dance costumes to make, and then the helping out back stage. I forget how much work goes into the shows not just for the dancers but for us backstage too, I think the offical name for us is roadies, but I dont think you could call someone with the number of wrinkles I have a roadie it's just  not right!!!

It was also my little friends 3rd birthday and I have always made his cake this year was no exception! He wanted Rocket from the Little Einsteins, oh yes it was fun! I was upto my neck in red ready roll icing. I aslo helped my eldest daugther make her husbands cake nothing as exciting just mickey mouse on the top of a round cake. For her first attempt it wasn't too bad!

Finally, I guess I should have mentioned this first I also gave up work month not that I have noticed all that "free" time. So apologies for not keeping my blog upto date I will do better.........

Monday, 7 February 2011

A French Delight


To make this lilac square gatefold card:
·         Cut from a sheet of dark lilac A4 card, a 15cm x 29.7cm card and fold into a gatefold.
·         From silver card, cut two 6.5cm x 14cm strips.
·         From pale lilac card, cut two 6cm x 13.5 strips and one 14cm square.
·         Onto the pale lilac strips, use the ‘Paris’ and ‘Tower’ stamps, with dark purple ink, to create a background.
·         Onto the pale lilac square, around the edge, stamp the swirls from the ‘Tower’ stamp, in silver ink.
This should be attached to the inside of your card for you to write your message.
·         To finish the inside of the card, using purple ink, stamp the ‘Tower’ of the insides of the gatefold.
Make sure that you cover the centre section, with a scrap piece of paper, otherwise you’re stamping will overlap onto the pale lilac insert you have added to the centre.
·         Mount the pale lilac strips onto the two silver strips of card and attached these to the front of the gatefolds.
·         To create the card topper, cut two different sized shapes; the larger of the two should be cut from dark lilac and the smaller from pale lilac.
·         Stamp the ‘Tower’ onto the smaller shape in purple ink.
·         Mount the pale lilac shape onto the dark lilac one. Centre the shapes on your card and attach to one side of the gatefold.


I also created a similar card in browns and creams, but using an uneven gatefold idea. This has become a fond favourite of mine! To do this, you cut out the same sized card as above and create a 4cm fold from one of the short edges. To create the other side of the gatefold, tuck the 4cm side in, and using a scoring board, score a half A4 line from the folded edge.