Thursday, 31 January 2013

Nina Crafts: Boys Toys

For this card I used the following stamp sets from Nina Crafts: Football Fanatic (ref: NC008), Girly Gadgets (ref: NC001) and Boys Toys (ref: NC007).


How to make
  • Stamp the football, No 1,(from Football Fanatic) camera (from Girly Gadgets) headphones and games control (from Boys Toys) with bleach onto a piece of navy card and leave to dry.
  • Stamp the Iphone onto a piece of white card in blue pigment ink and clear emboss it.
  • Next attach a piece of red card to blank A5 white card leaving a 0.5 border.
  • Trim the navy card down so you have a 2mm border of red showing.
  • Then cut out the Iphone and attach with foam pads to a piece of navy card,long enough to fit on an angle across the card, mount this first onto red card then white with a narrow border on the two long sides only.
  • Attach to the card with three red card candi down each side of the Iphone strip.

Tuesday, 29 January 2013

Nina Crafts: Burgundy Batik Style Card

I love how this card turned out, though it was abit of an experiment! To make it I used two new stamp sets from Nina Crafts, Window of waves (ref: NC003 and Posie Passion (ref: NC004).


How to make
  • Trim a piece of A5 burgundy card down by 1cm on two sides.
  • Stamp the square swirl in the top left and bottom right hand corners, in the other two corners I stamped the four dots once across the top and bottom, and three times down and up each side using bleach, Then using a brush, edge around the card. I like to use thick bleach spread onto a piece of kitchen roll. Leave to dry completely before letting it touch any other card.
  • Also onto burgundy card stamp one large and two small flowers from Posie Passion again with bleach and paint up the petals, leave to dry. Then cut out and shape the flowers
  • Next punch two holes in the top right hand side of the card and thread some black ribbon through.
  • Then attach to an A5 burgundy card with the flower and three black die cut leaves in the bottom left corner, add a black card candi to the flower and middle of the ribbon.

Sunday, 27 January 2013

Nina Crafts: St Patricks day

With St Patricks day just around the corner (17th March) I couldn't resist having ago at turning Posie Passion (NC004) into a shamrock!
For this card I have also used Musical Moments (ref: NC005) stamp set from Nina Crafts.


How to make
  • Stamp the word "Music" and notes onto a piece of white card in memento tuxedo black.
  • Trim down to fit a small white card with a narrow border when backed onto gold pearl paper.
  • Distress with pealed paint and pine needles and edge with a gold marker pen.
  • Attach a piece of green ribbon on an angle across the piece of card lower on the left hand side of the card, attach to the gold pearl then to the white card.
  • Stamp three of the small flowers with four petals onto green card in black ink, in one of the petals draw a stalk and make the three remaining petals into hearts using a black glitter gel pen (should look like a shamrock) cut out and shape them and attach in the bottom right hand corner of the card.

Saturday, 26 January 2013

Nina Crafts: No 1 Dad

This card was made using the Football Fanatic stamp set (ref: NC008) from Nina Crafts.


How to make
  • Stamp the football with "Dad" in one of the shapes and a shoe onto white card in blue ink, cut out and back onto medium blue pearl card cut out leaving a narrow border, 3Dgloss and leave to dry. You will need another football for the back, if you wish to 3Dgloss it stamp it cut it out but do not back onto blue pearl card.
  • Cut a piece of white card 15cm x 29.6cm score a line at 2.4cm, 24.4cm 28.4cm, cut another piece of white card 15cm x 26cm and score a line at 21cm, in the 21cm x 15cm sections of each piece of white card, randomly stamp the football with "Dad" in one of the shapes and "No 1" in light gray ink, and one football on scrap paper.
  • Place the scrap paper football over each of the of the footballs on the two white cards and distress around them with tumbled glass.
  • On the larger piece of card die cut a circle large enough for the football to go through, about 2.5cm down from the 2.4cm score line, (I used the largest Spellbinders Sprightly Sprockets S5-048).
  • Attach a piece of green card under this to the 23.4cm score line, down the outside edges of the die cut card attach a narrow piece of blue/white check ribbon with blue brads from the top of the card to just over the green card.
  • On the longer piece of card fold the 2.4cm and 23.4cm score lines to the back of the card and the 28.4cm score line to the front, on the other piece fold the 21cm score line to the front of the card, glue the small flap (on the longer card) over the bottom flap on the smaller card.
  • When the footballs are dry (if the blue pearl card is single sided edge the back with a blue pen) attach a piece of silver thread down the centre back and attach the other football over this.
  • Mark the centre at the top of the back of the card without the die cut, attach the thread to the mark so the football hangs in the die cut hole when the top flap is folded over the back of the card, glue the flap in place.

Friday, 25 January 2013

Nina Crafts: Pink ribbons and swirls

For this card I have used the new Ribbons and twirls stamp set (ref: NC002) and Window of waves (ref: NC003) from Nina Crafts.


How to make
  • Cut two pieces of pink card large enough to die cut the largest Eyelet square (Spellbinders Eyelet Squares S4-305) and one piece large enough for the next sizes down.
  • Stamp the square swirl on one of the large pieces of card in brown ink, die cut the two large squares, distress the stamped square in aged mahogany.
  • Next stamp the ballet shoes on the smaller piece of card from corner to corner, die cut the ballet shoes from the next size down eyelet square, colour in the shoes and ribbons with pink glitter gel pens, edge the squares with a gold marker pen.
  • Then edge a small fancy shaped white card with a black marker pen,.
  • Attach the large plain pink square to the card with the corners of the square in the centre of each side.
  • Wrap some narrow burgundy ribbon up the right hand side of the distressed square in and out of the top row and wrap around the left hand side, thread some ribbon in and out across the bottom row and glue to the back of the square, using foam pads attach this square over the plain pink one with the corners going into each corner of the white card and trim the ribbon.
  • Next attach the ballet shoe square with foam pads to the card the same way as the first square.
  • Finally add a pink and black card candi to the top two corners.

Thursday, 24 January 2013

Nina Crafts: Lighthouse

For this card I have  used Out at sea (ref: NC006) which is another new stamp set from Nina Crafts.


How to make
  • From an A4 piece of white card score an uneven gatefold card.
  • Then cut a piece of pale green card to fit the inside and larger front side gatefold.
  • On the inside piece stamp the lighthouse in the bottom left hand corner, with the words “Out At Sea is the best place to be“  under it and the anchor and rope in the top right hand corner in light gray ink, edge with a medium green pen, and attach to the inside of the card.
  • Cut a piece of pale blue card to fit the narrow side of the gatefold card, stamp "Ahoy" and "All Aboard" on an angle down this in light gray ink, edge with a medium blue pen, attach to the card.
  • Edge the last piece of green card with a medium green pen and draw some grass on the bottom 4cm.
  • Stamp the lighthouse on white card in black pigment ink and clear emboss it, colour in, cut out and shape it.
  • Emboss a piece of white card with the world map ( Couture Creations CO723038), trim down to fit the green card with a narrow border, colour it in. Then attach to the piece of green card and then to the gatefold card.
  • Using foam pads attach the lighthouse to the right hand side of the map so the bottom is just on the green card.
  • From the Sizzlits Coastal Set 38-9692 die cut the windblown fence, pilling, two flying seabirds and one standing seabird, add the standing seabird to the pilling and glue to the bottom of the blue card, with a flying seabird to the top of the blue card, add the windblown fence and a flying seabird to the lighthouse of the card.

Tuesday, 22 January 2013

Nina Crafts: Blue Music card

Here's is another card made using a new stamp set from Nina crafts, this one is called Musical Moments (ref: NC005).

How to make
  • Randomly stamp the Music word, notes and No 1 ( I took this from the Football Fanatic stamp set ref: NC008) onto a piece of white card in memento Paris Dusk.
  • Next trim down a piece of dark blue card to fit a small white card with a narrow white border.
  • Then trim down the stamped white card to fit on dark blue card with a narrow border as before and distress with stormy sky.
  • Attach a piece of pale blue ribbon on an angle across the stamped white card.
  • Stamp the keyboard onto white pearl card in Paris Dusk, cut out and attach to a strip of dark blue card, trim down and attach to fit 1cm up from the bottom of the stamped white card.
  • Finally add three white fabric flowers with a blue gem in the centre, and three dark blue die cut leaves in the top left hand corner.

Sunday, 20 January 2013

Nina Crafts: Ribbons Twirls

This card was made using another of the new stamp sets from Nina Crafts. This set is called Ribbons and Twirls (ref: NC002).


How to make
  • Onto a square beige pearl card stamp the “Ribbons and Twirls“  saying in the bottom right hand corner, and the ribbon twirls in the other three corners in memento rich cocoa.
  • Colour in with brown promarkers, cut a square of beige pearl card large enough to fit the ballet shoes across the corners.
  • Stamp the ballet shoes in rich cocoa colour in edge the square to match the ribbons on the card.
  • Finally mount onto brown pearl card with a o.5 border around and attach to the card.
Now wasn't that a quick one!
I love how this card looks, but you could colour it any colour and it would look just as good!

Saturday, 19 January 2013

Nina Crafts: No 1 Grandad

Dimension Stamps recently launched a new range of stamps called Nina Crafts, as the name would suggest they are designed by the lovely Nina and I got the chance to have a play with them!
This card is made using Football Fanatic Stamp set (stamp ref: NC008).


How to make
  • Randomly stamp the football and "No 1" onto a small white card in light gray ink.
  • Next stamp the football, shoe and "Grandad" onto white card in blue pigment ink and clear emboss them.
  • Colour in parts of the shoe in toning colours.
  • Cut out the football and shoe.
  • Attach a piece of green card to the bottom half of the card and distress using different shades of green ink.
  • Then attach the shoe to the bottom right hand corner and with foam pads and the football so the top is just over the top of the green card on the left hand side of the card
  • Finally cut out "Grandad" round off the corners edge in silver and attach to a blue die cut tag, tie through some narrow blue/white check ribbon and attach to the top of the card with blue brads.

Friday, 18 January 2013

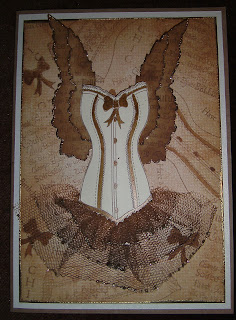
Francais Couture: Winged Corset

Last card (for now!) made using the Francais Couture stamp set (stamp ref: 2400074a) from Dimension Stamps .


How To Make
  • Attach a piece of cream pearl paper o.5cm smaller than an A5 card to an A5 kraft card.
  • Then cut a piece of cream card 1cm smaller than the cream paper and randomly stamp the corsets, words and bow in brown ink.
  • Next distress using Tea Dye, emboss around the edges in gold.
  • Stamp the large words onto cream card in brown ink and die cut the two largest sets of wings (Tim Holtz Layered Angel Wings 658259), distress in tea dye and gold stickles around the edges
  • Also onto cream card stamp the front of the corset in brown ink, and colour in parts of the corset with brown cosmic shimmer, cut out and shape.
  • Next cut out three pieces of white net cutting each piece a bit longer ( first one about 21cm wide x 2.5cm long).
  • Using stazon timber brown and rusty brown colour the net (it gets a bit messy!). When dry gather up the top edge of each piece to fit the bottom of the corset, sew the three pieces together and attach to the bottom of the corset on the back, open out the layers of the net so they do not touch and apply gold stickles to the bottom of each layer, when dry shape.
  • Finally  attach the wings to the top of the corset on the back, and centrally attach the corset to the card with 3D glue or foam pads.


Thursday, 17 January 2013

Francais Couture: Green Card

Here's another card made using the Francais Couture stamp set (stamp ref: 2400074a)  from Dimension Stamps .


How To Make
  • Randomly stamp a background onto an A5 piece of white card using the large words, Chic, bow, the front of the corset and Masque Eye (Stamp ref: 0105026A) in memento tuxedo black.
  • Next trim it down to 12.8cm x 19cm and distress with Forest Moss.
  • Attach this centrally to a 13.8cm x 20cm piece of gold pearl paper then onto a burgundy A5 card.
  • Stamp the back of the corset onto cream card in brown ink cut out and cover in modpodge sparkle
  • Then paint a die cut crown in burgundy when dry cover in mogpodge sparkle.
  • Make a fan from the thin parts of a peacocks feather held in shape with a piece of gold trimming.
  • Finally using 3D glue or foam pads attach the corset on an angle half up the card with the crown above and the fan below it.


Tuesday, 15 January 2013

Flower Powered: Especially For You

Happy New Year!

I can't believe it is mid January already! Whilst I was doing a bit of a tidy up I came across a couple of cards I hadn't shared, so here's the first one it was made using the Flower Powered Stamped set from Dimension Stamps (stamp ref: 2400075a).


How To Make

  • First I die cut a scalloped oval (Grand Scalloped Oval LF-111) from the front of a purple A5 card.
  • Next I stamped the single flower in each corner with a leaf swirl along each side of the flower, using Memento Grape Jelly and coloured  it in with purple toning Promarkers and glitter gel pens.
  • Then I stamped the bike onto a piece of white A5 card in Memento Grape Jelly and coloured as before.
  • Next I lightly distressed the bottom of the card in Distress Ink Forest Moss and the top in Stormy Sky.
  • Finally I stamped “Especially For You” (Grand Word Perfect 2 stamp ref: 1803069a) above the seat and handlebars in Memento Grape Jelly.
  • To finish it off I trimmed it down and attach to the inside front of the card.