Saturday, 29 June 2013

CRD: Can a Dragonfly be an Owl???

Of course it can!!!!

These little fellas are made using the Build Your Own Dragonfly stamp set from Crafty Roo Designs. Aren't they so sweet???


Stamps: BYO DragonflyOn the Branch. The sentiment is by Dimension Stamps

Inks/Stains: Memento ink: Rich Coco, Olive Grove. Distress Inks: Tea Dye. 


Other items: Promarkers and Glaze.


Friday, 28 June 2013

CRD: Happy Retirement Crafty Jack

I sometimes get stuck for retirement cards, especially for those who don't garden or fish! So I decided to have a play and see what I came up with.....


I think it works!

For this card I used:

Stamps: Crafty Jack, Baby BirdLarge Corner Cogs. The sentiments are from Dimension Stamps.


Inks/Stains: Distress inks: Stormy Sky, Forest Moss. Memento ink: Tuxedo Black, Rich Cocoa. 

Other items: Tim Holtz Tattered Leaves (656927) and Autumn Gatherings (657454).


Thursday, 27 June 2013

CRD: Purple Dragonfly

Dragonflies have to be one of my all time favourite things to work with and the Build Your Own range from Crafty Roo Designs is great because it lets you stamp your dragonfly in any direction.....


This card was a real quick one to do! It took longer for the glaze to dry than to make the card!

Stamps: BYO Dragonfly, Mini Cog Corners.

Inks/Stains: Memento ink: Grape Jelly, Lulu Lavender. 

Other items: Ribbons, Lace, Hat Pins, Beads and Glaze.

Saturday, 22 June 2013

Project Club: Main card

Last card I promise for this months Project Club for more information on the Dimension Stamps project Club please visit their website www.dimensionstamps.com


How to make: 
  • Stamp the bow in each corner and “Little Girl” in the middle along each side on the inside base of a small square white twisted easel card, in Memento Lilac Posies.
  • On an extra square front of white card stamp “Little Girl” in the middle along each side and edge the card in Memento Lilac Posies.
  • Onto an 11cm x 11cm square of pink card stamp the pram and edge the card in Memento Lilac Posies, stamp the pram onto pink card, colour the hood, apron and side trim on the prams.
  • Centrally attach the square piece of pink card to the square piece of white card, and attach this to the twisted easel card.
  • Cut out and attach the other pram to the pink card using 3D foam pads.
  • Make a bow from white chiffon ribbon and attach to the top left corner.
  • Stamp three bows in Memento Lilac Posies onto white card, cut out and shape attaching one to the other three corners.
  • Add a crystal gem to the three bows and one between the side trim on the pram.
  • Stamp “Congratulations on the birth of your” onto a 5.5cm x 2.6cm piece of white card and edge the card in lilac posies, mount onto a 6cm x 3.1 cm piece of pink card which has been edge in lilac posies, using foam pads attach to the inside of the card to hold the twisted easel open.

Friday, 21 June 2013

Project Club: Royal Baby Cards

I couldn't resist making a card for the Royal Baby.


How to make:
  • Stamp the large crown in each corner of a dark cream A5 card and “Royal Baby” across the top and bottom of the card in Memento Rich Cocoa.
  • Using a light brown Promarker colour in the fabric part of the crowns and distress in Tea Dye Distress Inks.
  • Cut a piece of gold pearl card10.5cm x 10cm, and two pieces of dark cream card 11cm x 10.5cm and the other 10cm x 9.5cm.
  • Onto the smaller piece of cream card with the 10cm sides to the top and bottom stamp the pram with the small crown on it in Memento Rich Cocoa, colour in the hood, apron and fabric part of the crown in light brown, distress using Tea Dye Distress Inks.
  • Attach this in the centre the larger piece of cream card to the A5 card (with the longer sides top and bottom), centre the gold card over this.
  • Punch to two holes at the top and bottom of this card towards the crowns and thread through some cream ribbon with a bow on the top piece, using 3D glue or foam pads centrally attach the stamped piece of card.


This card was made almost the same as the cream and brown card but the centre panel has the long sides going down the sides of the card, the pram was stamped onto another piece of white card cut out and attached using 3D glue or foam pads, white braid and pearls were used in place of the ribbon.

Project Club: Blue Bottle Card

I got a little carried away this month with my Project Club stamps, so here is another....


 How to make: 

  • Cut a 6cm x 9.5cm piece of pale blue card in the centre stamp “Congratulations on the birth of your Little Boy” and edge the card in Memento Paris Dusk, attach to the right hand side of a white DL card.
  • Next attach two narrow pieces of blue ribbon down the left of this.
  • Stamp two bottles onto white card, two bows from the bottle onto blue checked card, two bottle tops and two ducks from blue card, cut out all the pieces and shape them, using 3D glue assemble the bottles and glue them to the top left and bottom right hand corner of the blue card.
  • In the other two corners, add a small blue button, and a duck to the bottom right of the bottles.

Thursday, 20 June 2013

Project Club: Turquoise Baby News

This card is very similar to this mornings but much more modern.


How to make:

  • Stamp the pram onto an 11cm x 11cm square of turquoise card using a turquoise pigment ink and clear emboss it, ink around the edges and clear emboss it, colour in the hood, apron and side trims.
  • Mount onto an 11.5cm x 11.5cm piece of silver pearl card, and centrally attach to a small square white card.
  • Attach a narrow piece of ribbon around the outside of the square.
  • Make a bow from the ribbon and attach a silver baby feet charm.
  • Attach the bow to the top left corner of the ribbon.
  • Tie silver cord through three turquoise buttons, attach one button with 3D glue in the other three corners.
  • Finally add a turquoise heart gem stone to the ribbon bow and between the side trim on the pram. 

Project Club: Cream and Brown Baby News

This card turned out very traditional looking.


How to make: 

  • Around the front edges of a small cream card stamps parts of the pram in Tea Dye Distress Ink and distress.
  • Centrally attach a 12cm x 12cm square piece of brown pearl card to this.
  • Onto an 11cm x 11cm square piece of cream card stamp the bow in each corner with “Congratulations” centrally along each side in Tea Dye Distress Ink .
  • Using a light brown Promarker colour in the bows and edge the square with Tea Dye Distress Ink
  • Next attach centrally to the card.
  • Stamp the pram onto cream card using Tea Dye Distress Ink, colour in the hood, apron and side trims with Promarkers, cut out and distress using Tea Dye Distress Ink.
  • Using 3D foam pads attach to the card.
  • Finally thread and tie gold cord through four small brown buttons and attach one to each corner and one light brown button to the pram using 3D glue.

Wednesday, 19 June 2013

Project Club: Pink and Yellow Gift Bags

I love making gift bags for popping those handmade gifts into and this months project club set work really well! So well in fact I had to make two!


How to make: 
  • Die cut the a large white eyelet square (Spellbinders S4-305).
  • Using Memento Rhubarb Stalk stamp “Congratulations on the birth of your” and “Daughter” in the top right hand corner, with the swirl stamp from Petal Passion (2400065A) down the left hand side, thread white chiffon ribbon from the top left  to the bottom right hand corner.
  • Stamp the swirl across the bottom and down the right hand side of the pink bag.
  • Attach the white die cut square to the top left hand corner of the bag.
  • Next add adhesive transparent gem stones to the three holes in the top right and bottom left hand corners and one the top left corner.
  • Then attach a white bow to top left corner with a transparent heart bead glued to the bow.
  • Stamp the pram onto toning pink card, stamp the floral end of the swirl onto the pram, add a transparent heart gem just above.
  • Colour in the hood and apron cut out.
  • Finally attach to the bottom right hand corner with 3D glue or foam pads.


How to make: 
  • Using a yellow paper bag.
  • From cream card die cut the smallest Grand Decorative Circle (LF-015) and attach to the centre of bag.
  • Using Memento Toffee Crunch stamp the duck in the bottom two corners.
  • Stamp the pram onto a pale golden yellow card.
  • Colour in the hood and apron cut out and attach in the circle with 3D glue.
  • Tie a gold chiffon bow to the bag handle.
  • Finally add a small tan button to the bow and pram.

Project Club: Blue and White Baby Boy Card

A card for those baby boys!


How to make:
  • Stamp the large crown onto silver pearl card in Memento Paris Dusk.
  • Colour in the fabric part with a blue promarker and cut out.
  • Next stamp “BABY BOY” (Alphabet with Words 2400050a) onto medium blue pearl card in Memento Paris Dusk, cut out each letter mount onto white pearl card in an oval shape overlapping the letters, place do not glue the crown on the top of the “O” cut out as one piece leaving a narrow border, mount onto silver pearl card cut out as before.
  • Stamp “Congratulations on the birth of your” onto white pearl card in Memento Gray Flannel mount onto silver pearl card and attach to the top left hand corner of a small white pearl card.
  • Stamp two septa’s across the bottom of the card in Memento Gray Flannel, colour in with light gray and blue Promarkers.
  • Attach BABY BOY to the card shape the crown and attach with 3D glue.
  • Finally add a blue gem to the crown and five to the top right hand corner.

For more information about the Dimension Stamps project visit their website for more details.

Tuesday, 18 June 2013

Project Club: Lilac Bottle Card

This card is a has a real girly feel, though it could easily be changed into blues! 


How to make: 
  • Mask off 2.5cm around the outside edges of the front of a lilac A5 card.
  • Randomly stamp “Little Girl” in the centre space in Memento Grape Jelly.
  • Cut two stripes of lilac card 2cm x 15cm and stamp a row of ducks on each one and colour in the beaks.
  • Next stamp the bottle with the small crown in the bottom right twice onto white card. And the bottle top twice onto dark lilac card and the ribbon twice onto lilac card, over stamp the lilac bows with a small swirl stamp (Window of Waves NC003 would be perfect).
  • Cut out all the parts and shape, put together with 3D glue and add a clear gem stone to the ribbon.
  • Attach a piece of lilac striped ribbon down each side of the leaving 8.5cm across the middle.
  • Next attach the duck strips of card to the top and bottom of the leaving 1cm at the top and bottom of the card.
  • Finally using 3D glue attach three white buttons to each piece of ribbon, and the two bottles down the middle of the card.

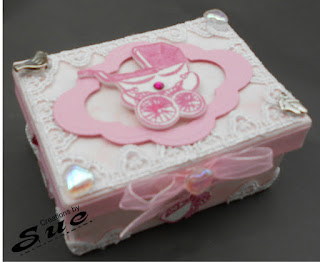
Project Club : Paper Mache’ Box and Magnetic Heart

This months project club stamp set from Dimension Stamps is all about babies (and Royal ones at that!). I got a little carried away creating things this month,.....

First up is a small Paper Mache’ Box for keeping those precious first curls in!


How to make:
  • Cover the inside and outside of a small rectangle box and it's lid in pink parchment paper.
  • Attach white lace around the outside edge of the box lid and just on the corners of the box.
  • From pink card die cut a frame using the 2nd and 3rd sizes up from the smallest Labels Six (Spellbinders S4-230) and attach to the box lid with 3D glue.
  • Add some pink chiffon ribbon around the sides of the lid add a bow to one of the long sides (this will be the front).
  • Stamp the pram and four bottles onto white shrink plastic in Memento Rose Bud.
  • Colour in the hood, apron, bottle tops and bows with pink Promarkers.
  • Cut out and shrink with a heat tool.
  • Using 3D glue attach the pram to the middle of lid.
  • Next put the lid on the box and attach a bottle to each side of the box.
  • Remove the lid and attach a transparent heart bead to the bottom left and top right hand corners of the lid, also one to the bow.
  • Attach a silver bird charm in the top left and a silver feet charm in the bottom right hand corners.
  • Finally add a dark pink gem stone to the pram and one to the other three sides of the ribbon.


This Magnetic Heart was made in the same way but this time I used the Labels Six spellbinders to make a photo frame.


How to make: 
  • Cover the magnetic heart with blue paper.
  • Attach some white ric rac braid around the outside edge.
  • Stamp the pram onto white shrink plastic in Memento Paris Dusk colour in the hood and apron with a blue Promarker, cut out and shrink with a heat tool.
  • From medium blue pearl card die cut a frame using the 2nd and 3rd sizes up from the smallest Big Scalloped Ovals Lg (Spellbinders S4-251) and one from the 3rd size only in blue card onto this stamp the small crown in Paris Dusk under that write PHOTO, glue the outside edge of the frame to the solid blue piece leaving open enough room to insert a photo, attach to the top right hand side of the heart.
  • Stamp the bottle twice onto white pearl card and the bottle top onto blue card in Paris Dusk , with a blue Promarker add spots the bows and cut one out, cut out the other bottle and blue top shape all the pieces and glue together with 3D glue, add a small silver baby feet charm to the bottom right hand side of the bottle.
  • Attach a small silver butterfly charm to the bottom point of the heart.
  • Attach the bottle to the left of the frame and the pram to the bottom point using 3D glue.
  • From medium blue pearl card die cut “Love” (Spellbinders Jewel KeysC5-099) and attach on an angle to the bottle.
  • Finally add five adhesive shimmer dots from the top centre over to the right of the heart, and one to the bow and pram.     


Friday, 14 June 2013

It's been a while.......

How time has flown these last few weeks, I am going to blame my lack of posting on this fabulous weather we have had! I have been spending hours in the garden getting around to all those jobs that have been piling up over winter and I hadn't got to yet this year!

I have also been working hard on sample cards for Crafty Roo Designs (aka Kym), they have their first stamp show this weekend at the Don Valley in Sheffield and I have got carried away working with the new Poppy Cogs stamp set as I just love working with it!

Don't tell Kym! But here is a sneaky peep at a couple of the cards I have made.......


I will be posting the Dimension Stamps Project Club details shortly.....