Monday, 13 June 2011

A table by the window please


Stamp the lady onto some dark cream card using black ink, and colour her in, on a piece of stone and brown card stamp the doorway in black ink, cut out the panels on the brown doorway only, now cut out around the door, on the solid line which is the top of the step, with a sharp knife cut across the top and bottom of the next line in, and down the centre of the door, score down the sides so they can be opened.

Cut away the inner door from the stone card, and glue the brown door onto the stone frame just above the step.

Place the lady behind what has now become a window, when this is dry cut out around the stone window frame.

I embossed some light gray card with a brick design, coloured this in using distress ink :- fired brick and vintage photo, trim this down to 17.5cm x 12.5cm, back this on to a piece of lilac card 18.5cm x13.5cm, now attach this centrally onto an A5 white card.

Attach the window to the top centre of the brick work, punch out some leaves and flowers to go up the sides of the window, add glitter glue to the flowers.


The black and white card was made the same way, only the position of the window was changed, and it only needs leaves and flowers up one side of the window, in the space under the window, you can put a backed greeting of your choice.

Cake anyone?

Fold apiece of A5 pink card in half, draw round the top 10cm of the coffee cup, cut this out and round off the bottom two corners.

From a piece of thick handmade white paper, two shaped tops were cut out about 11cm x 7cm in size, attach one to the front and back of the card so that they match, stamp “lets meet for a drink” onto white ribbon using black versacraft ink and heat set this, a slit was made half way up the pink card for the ribbon to go through, this was attached to the inside of the card as was the other end of the ribbon.

Punch out two black leaves and glue to the top of the card, punch out about twenty small pink flowers, place two of the flowers onto the ribbon, following the bottom shape of the white paper, put a row of pink flowers, add some flowers to the leaves, to the centre of each flower add some black glitter.

This would make a good card topper too.

More cups


As Fathers Day is just around the corner I made two cup cards with that in mind.

The cheeky party invitation was made without the wrap, and as it will be a cold drink it has stars on top of the liquid, to give it a bit of a fizz.

Disposable coffee cups

As the coffee cup template I used with the shrink plastic on the ATC, looked about the right size to make cards with, I thought why not give it try.

On a piece of A4 card make a fold 11cm in on long side of the card.

Place the cup template to the fold and draw round this, cut it out, place the oval shaped top onto the front of the card, draw round the bottom to make the top rim of the cup, move it down about .5cm , and draw round the top until you meet the rim line, this is now the liquid level.

Both wraps can be cut out of a piece of A5 card, the lady fits on the small one, the doorway on the larger one.

Place the wrap template to the fold and draw round this, cut it out, using a darker shade of ink stamp lady/doorway in the middle of it, using a promarker in the same colour as the ink, draw some dots or small line at the top and bottom of the wrap.

Draw round the top rim of the cup with the pro marker, stamp “ lets meet for drinks” under this ,with the promarker put dots or small lines to each side of this ,at the bottom of the cup “coffee” two or three times,  in between put dots or lines, with a brown promarker colour in the liquid part, draw round some heat swirls, and glue them on to the liquid, using double sided tape fix the wrap to the cup so it over laps a bit.   

A portait of a lady

A square white card was used to make this card, I cut a piece of pink backing paper 1cm smaller than the card, then attached this centrally onto the card.

Using nestabilities (set s4-305 eyelet square), cut out and emboss the largest one in purple, do the same with the next size down only in a pale pink, make a mask to fit this, so only the centre raised square can be seen, with this in place, in purple ink, stamp as much of the lady that can be seen, colour in the hat, bag and dress frill in purple gel pen.

Attach this in the centre of the purple square, to the top left hand corner attach a white chiffon bow, glue one of the purple cut out circles to the bow ,and 3D gloss it (why waste them).

Using foam tape or pads on the back of the purple square, fix this centrally onto the card.

The cream card is made almost the same as the white card.

As its made into an easel card you will need, an extra piece of cream card the same size as your card, and backing paper, using the extra piece of cream card, make this up as the purple card only using cream and brown, miss out the part on the ribbon and purple circle.

Cut out and emboss the smallest square in cream, and the next size up in brown, make a mask to fit the cream one so you just see the raised square, with this in place, ink up only the word “with” stamp this to the top of the square, now do the same with the word “love” in the space left (it just fits), colour the raised dots in brown, attach this to the brown square.

Working with the folded cream card, fold the front in half to the inside of the card, to form the easel, attach the second piece of backing paper to the inside of the card, cut a piece of cream card 3cm x1cm smaller than the backing paper, using foam tape or pads attach the brown square, to the centre of  this.

Have the open ends of the card facing you, put double sided tape on the bottom half of the card only, take a piece of cream card with the lady on, making sure you have the lady facing  you, attach this to the card, now take the strip of cream card and using foam tape, attach this to the inside of the card ,so brown square is about 1cm inside the card.

Now just add a flower to the bottom left hand corner.

Monday, 6 June 2011

Quick and simple

There are times when we need a card in a rush, this one takes no time at all. I used black and white, but just think of all the colour combinations and greetings you could use for yours.
Using a 15cm square white card, I stamped ‘Let’s meet for drinks’ in black ink around the side edges to create a border.

The lady was stamped onto some additional white card, again in black ink, and using a black gel pen I enhanced some of the features by colouring them in.

I cut around the lady and edged it using a silver pen. Then I mounted this onto a piece of 10.5 square black card using silicon glue or foam pads. The black card could then be mounted onto silver card, but I used the silver pen around the edges to give the same effect. This is then attached to the centre of the card.

4 small flowers were punched from black card and one was placed in each corner of the card, with a clear Gem added to the centre of each.

This looks good if you have time to emboss the lady!

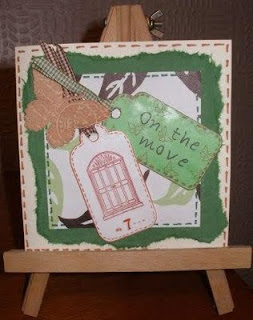
On the move

With a shrink plastic tag that was leftover, I came up with this card.

From a piece of thick, handmade green paper, I ripped a square to fit onto a cream square card.  

A square was cut from patterned paper, roughly 2cm smaller than the torn square and around the edges added a running stitch effect using a dark green promarker.  I mimicked this around the edges of the cream card with a brown promarker pen.

Using a sizzix die, a tag was cut  from green card, decorated by stamping small butterflies and adding the running stitch around the edges in brown to match the card. On the tag, I stamped ‘On the move’ using crystal tips and black ink.

The finishing touches to the card included adding coordinating ribbons to the tags and a Cuttlebug butterfly, which was shaped to lift the wings from the card.


ATC's

As the stamps are quite large, I had some fun time with shrink plastic. The first tag turned out way too small, but I got there in the end. The template ended up approximately 19.5 x10.5 cm, then shaped at the top and rounded on the corners.

Draw around this with a brown permanent pen onto white shrink plastic, cut this out and stamped the doorway in rusty brown Stazon, making small running stitches just inside the brown outline with the brown pen. I put a number on this but can leave this out. This is where the fun started I had to keep on turning it as it was so large.

 I backed an A.T.C. card with white and green paper, using a dark green promarker put a border of small running stitches to match the tag. Attach a brown ribbon to the tag glued it to the card.

The lady one was made in the same way

New Home

I wanted to make some cards that specifically used the door stamp and came up with a ‘New Home’ idea.

On a 15cm square white card, using black soot distress ink, colour in the bottom 3cms of the card to create the driveway. Then using fire brick and brushed corduroy distress ink colour in the rest of the card, working from side to side to give the effect of a wall.

Stamp the doorway twice, once each on a stone and brown coloured card using black ink. Cut out the stone card, cut out the full doorway, then from the brown card cut out just the doors and attach to the stone doorway. Stick the doorway off centre to the right of the card, leaving enough room for a greeting in the top left corner.

I used the planter and wellies stamps from April 2008 Project Club, and the tree from September 2009 Project Club to decorate around the doorway, however you can use whatever you have available. I added 3D glaze to the wellies to make them shine like new.

Don’t forget to add a greeting; this could be a banner, a plaque or just a mounted greeting.

The Dad card it is almost like the New Home card, only it’s on an A5 Cream hammer finished card to add texture to the stone wall. (I thought I had a stone wall mask, but could I find it while making the New Home card, oh no. It turned up a few days later, so I thought I could turn the New Home into a Father’s Day card). I used antique linen, wild honey, vintage photograph and brushed corduroy distressed inks over the stone wall mask to create a lighter coloured wall.

The letters were stamped onto green card using black ink. Once dry I then stamped over the letters with parts of the doorway, in a brown ink, these were cut out and shaped. After attaching them to the card, the letters were then 3D glazed.