Saturday, 31 August 2013

CRD: All about the cogs

For this card I raided my ribbon bag and found this wool that looks like chain! I think it works really well with the cogs, and makes a really quick and simple card.


Stamps: Large Cog Corner, Postage Sentiments.

Inks/Stains: Memento ink: Paris Dusk. Distress Inks: Stormy Sky. 

Other items: Glossy Accents.

All of the stamps used can be purchased from www.craftyroodesigns.co.uk 

Thursday, 29 August 2013

CRD: Crafty Gent

I have been busy recently making samples for Crafty Roo Designs, I love working with their stamps as they are really quirky, and they scream out for Distress Inks.........


Stamps used: Crafty Jack, Large Cog Corners, Postage Sentiments.

Inks/Stains: Memento ink: Rich Coco. Distress Inks: Antique Linen, Weathered Wood 

Other items: Glossy Accents, Tim Holtz Umbrella Man (657189).

All of the stamps used can be purchased from www.craftyroodesigns.co.uk 


Saturday, 24 August 2013

Project Club: Main card for August

Here is this months main project club card from Dimension Stamps. All of the things you need to make it are included with the project club stamps.

If you would like to learn more about the Dimension Stamps Project Club please visit there website www.dimensionstamps.com.


How to make:
  • Trim 1cm off one long and one short side of an A5 piece of pale green card, stamp the tree in the top left and bottom right hand corners, with the Cherry Blossom words in the other two corners using Memento Toffee Crunch.
  • Colour in the tree trunk and branches in a tan Promarker.
  • Attach a piece of brown chiffon ribbon 2cm in down the right hand side of the piece of card.
  • Fold a piece of A4 Kraft card in half and centrally attach the pale green piece of card to it.
  • Cut a 17.5cm x 7.5cm piece of medium green card and  mark 3cm in from each corner across one of the 7.5cm ends and 4cm down each side, cut these corners off to make a tag shape, punch a hole in the top and use a corner punch on the bottom two corners, round off the cut edges.
  • Using Memento Rich Cocoa stamp the tree in the middle of the tag, fill in the top and bottom with the Cherry Blossom words, colour in the tree trunk and branches in tan.
  • Stamp three birds onto medium green card in Memento Rich Cocoa and cut them out.
  • Make a bow from raffia and attach to the tag.
  • Attach the tag on an angle from the top left to the bottom right hand corner using foam pads, shape and attach the birds to the bottom of the card with 3D glue and apply glossy accent to them, add gold stickles to some of the blossom on the green tag.   

  Here are a couple more cards I made using the same idea


Friday, 23 August 2013

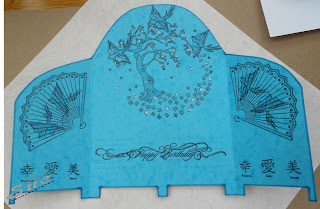
Project Club: Turquoise Screen

I couldn't resist making a screen shaped card as soon as I saw these stamps!


How to make:
  • Make an A4 piece of turquoise card into a gate fold card, round off the front top edges 9.5cm at the front edge to 15cm at the fold then round off the back corners.
  • Mark off 1cm up and out from the bottom folds and centre of the card cut away to make legs.
  • On the cut off piece of card stamp three birds in Memento Tuxedo Black, colour in with a darker turquoise pen, cut out shape and apply glossy accent leave to dry.
  • Open out the card and on the inside back stamp the tree in the top centre using Memento Tuxedo Black, under this stamp “Happy Birthday”(an old Hot of the Press stamp), on each inside front  stamp the three symbols across the bottom, with a fan stamped above them in which  two birds have been stamped.

  • Colour in the birds, the top edge, down the side of the fan, tree trunk and branches with the turquoise pen.
  • Turn the card over and stamp bamboo (a very old Stampin Up stamp) on the two fronts of the card in black ink.
  • Cut two strips of white card to fit across the fronts of the card and 2 cm deep.
  • First stamp part of the tree in turquoise ink then over stamp with the three symbols in black, mount onto black card and attach to the fronts 0.5cm up from the bottom of the screen.
  • Stamp the tree in turquoise ink onto two 9cm x 7.5cm pieces of white card, colour in the trunk and branches with a turquoise pen, over stamp with the fan in black ink, cut out and punch a hole in the bottom thread through narrow turquoise ribbon add three iridescent beads to each end of the ribbon, attach to the fronts of the card with foam pads.
  • Finally attach the three birds around the top of the tree with 3D glue add blue glitter glue to the top edge of two white fans and to some of the blossom on the back tree.    

Thursday, 22 August 2013

Project Club: Cherry Blossom

I love how this card turned out, I can see me making it in many colour combinations.


How to make: 

  • Fold an A5 piece of dark cream card in half.
  • Using Memento Rich Cocoa stamp a background with the Cherry Blossom word stamp.
  • Onto a 13.5cm x 13.5cm piece of dark cream card stamp the tree using Memento Rich Cocoa, a row of five birds onto a 3.5cm x 14.8cm strip of dark cream card, and Happiness onto 1.5cm x 2cm piece of dark cream card edge in Memento Rich Cocoa.
  • Colour in the trunk, branches and three of the birds in tan.
  • Die cut the cream tree using the smallest circle from (Grand Decorative Circles One LF-015) and from brown pearl card cut the next size up.
  • Attach this to the top of the cream card, using foam pads centrally attach the cream circle on top of the brown circle.
  • Mount the strip of birds onto a 4.3cm x 14.8cm piece of brown pearl card, attach this 1cm up from the bottom of the card.
  • From brown chiffon ribbon make a bow and attach between the strip and circles on the left hand side of the card.
  • Finally glue the Happiness to the bow. 

Wednesday, 21 August 2013

Project Club: Yellow Gift Bag

Yes not the best title in the world but, that is, what it is!

How to make: 
  • Cut a piece of toning yellow card smaller than the front of the gift bag and a 1.5cm strip the same length.
  • Stamp the Cherry Blossom words in the bottom left hand corner and edge the piece of card using Memento Toffee Crunch, 
  • Centrally stamp the tree using a Versamark pad and emboss in gold.
  • Colour in the trunk and branches in tan.
  • Attach centrally to the front of the gift bag.
  • Next stamp Love, Happiness and Beauty down the 1.5cm strip in Memento Rich Cocoa.
  • Edge the strip in Memento Rich Cocoa and mount onto a 2.2cm piece of a darker golden yellow card edged in Memento Rich Cocoa.
  • Attach 1cm in down the right hand side.
  • Stamp three birds onto the darker card in Memento Rich Cocoa and cut them out.
  • Add a bird to the top left hand corner, glitter glue over the bird, tie a piece of toning wide edged chiffon ribbon to right hand side handle and glue a bird to each end.  

Project Club: Wishing Fan

I think I got a little carried away using the fan stamp from this months project club!


How to make:
  • Fold an A5 piece of dark green card in half.
  • On the front randomly stamp the bird and Happiness using a versamark pad and gold emboss it.
  • Onto a piece of pale green card stamp the fan with a dark green pigment ink and emboss in green.
  • Cut out the fan, punch a hole in the bottom and thread through two pieces of narrow gold ribbon and add a bead.
  • Next stamp “Wishing you all the Happiness in the world”  and Happiness once more onto pale green card in dark green ink, cut out the saying and the extra Happiness to fit over the saying.
  • First mount the saying onto dark green card then onto gold card, gold emboss the edges of the extra Happiness.
  • Attach to the saying with a foam pad to the bottom of the card with the fan above it, add green glitter glue to the top edge of the fan.

Tuesday, 20 August 2013

Project Club: Fan-tastic Fans

So here is this months Dimension Stamps Project club cards, a little later than planned, but better late than never hey????

I love how this card turned out the fans are just wonderful!


How to make: 
  • Stamp part of the tree onto three 9 cm x 7.5 cm different shades of pink card using pink in.
  • Colour in the tree trunk and branches in tan.
  • Over stamp with the fan using a black pigment ink and clear emboss them.
  • Cut out and punch a small hole in the bottom of each one.
  • Loop a piece of narrow pink glitter ribbon through each fan and glue two small dark pink sequins to each end.
  • Randomly stamp the bird onto a black DL card using black pigment ink and clear emboss it.
  • Using foam pads and starting at the bottom of the card with the darkest fan attach the fans.