Showing posts with label Projects. Show all posts

Saturday, 24 October 2015

CRD: Monthly Make - Time for Tea

So when I got Octobers Monthly Make set all Kym kept saying was "Wouldn't it make a lovely plaque" so you can imagine my surprise when I saw her working on her project for the month and it turned out to be a jar!

So, here is a plaque I made using Octobers Monthly Make and Lizzie stamp sets.


Novembers set is nearing completion and I have had real fun playing with that set, I really can't wait to share it with you all!

Monday, 12 October 2015

CRD: Monthly Make - Pillow Box

When I was working on the Lavender Card for this months Monthly Make, all I could think was wouldn't this look lovely as a gift box, so I dug out a very old box that I use as a template and this little pillow box took no time at all to make.

If you are wanting a pillow box template just type "free pillow box template" into google and you will find one in every size imaginable!!!

Or there is a lovely die you can get from Once upon a stamp


Materials

  • Small Lavender Pillow Box, White Card
  • Memento Rich Cocoa, Sweet plum, Pistachio
  • 7cm Green Check Ribbon, Narrow Green Ribbon
  • Hole Punch
  • Double Sided Tape or Glue
  • Craft Tools

How to make

  • Randomly stamp the lavender onto the pillow box the stems in Pistachio and the flower heads in Sweet Plum.
  • Stamp the label onto White card using Rich Cocoa, with the shorter ends at the sides stamp Happy Birthday just above centre on the left side, with the swirl below it using Rich Cocoa, stamp some lavender to the right in the two colours as before.
  • Cut out the label leaving a narrow white border, punch at the shorter ends, and two smaller holes in the middle of the lavender, tie the narrow green ribbon through the lavender.
  • Make up the pillow box using Double Sided Tape or Glue, thread the green check ribbon through the label so you can tie one ribbon below Birthday and the other above the lavender, place around the pillow box and tie.


If you would like more information on our Monthly Make then check out their website.

Wednesday, 21 August 2013

Project Club: Yellow Gift Bag

Yes not the best title in the world but, that is, what it is!

How to make: 
  • Cut a piece of toning yellow card smaller than the front of the gift bag and a 1.5cm strip the same length.
  • Stamp the Cherry Blossom words in the bottom left hand corner and edge the piece of card using Memento Toffee Crunch, 
  • Centrally stamp the tree using a Versamark pad and emboss in gold.
  • Colour in the trunk and branches in tan.
  • Attach centrally to the front of the gift bag.
  • Next stamp Love, Happiness and Beauty down the 1.5cm strip in Memento Rich Cocoa.
  • Edge the strip in Memento Rich Cocoa and mount onto a 2.2cm piece of a darker golden yellow card edged in Memento Rich Cocoa.
  • Attach 1cm in down the right hand side.
  • Stamp three birds onto the darker card in Memento Rich Cocoa and cut them out.
  • Add a bird to the top left hand corner, glitter glue over the bird, tie a piece of toning wide edged chiffon ribbon to right hand side handle and glue a bird to each end.  

Wednesday, 19 June 2013

Project Club: Pink and Yellow Gift Bags

I love making gift bags for popping those handmade gifts into and this months project club set work really well! So well in fact I had to make two!


How to make: 
  • Die cut the a large white eyelet square (Spellbinders S4-305).
  • Using Memento Rhubarb Stalk stamp “Congratulations on the birth of your” and “Daughter” in the top right hand corner, with the swirl stamp from Petal Passion (2400065A) down the left hand side, thread white chiffon ribbon from the top left  to the bottom right hand corner.
  • Stamp the swirl across the bottom and down the right hand side of the pink bag.
  • Attach the white die cut square to the top left hand corner of the bag.
  • Next add adhesive transparent gem stones to the three holes in the top right and bottom left hand corners and one the top left corner.
  • Then attach a white bow to top left corner with a transparent heart bead glued to the bow.
  • Stamp the pram onto toning pink card, stamp the floral end of the swirl onto the pram, add a transparent heart gem just above.
  • Colour in the hood and apron cut out.
  • Finally attach to the bottom right hand corner with 3D glue or foam pads.


How to make: 
  • Using a yellow paper bag.
  • From cream card die cut the smallest Grand Decorative Circle (LF-015) and attach to the centre of bag.
  • Using Memento Toffee Crunch stamp the duck in the bottom two corners.
  • Stamp the pram onto a pale golden yellow card.
  • Colour in the hood and apron cut out and attach in the circle with 3D glue.
  • Tie a gold chiffon bow to the bag handle.
  • Finally add a small tan button to the bow and pram.

Tuesday, 18 June 2013

Project Club : Paper Mache’ Box and Magnetic Heart

This months project club stamp set from Dimension Stamps is all about babies (and Royal ones at that!). I got a little carried away creating things this month,.....

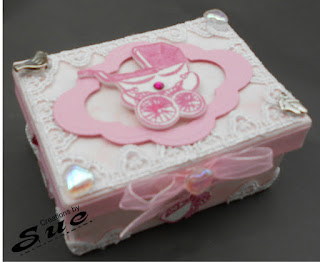
First up is a small Paper Mache’ Box for keeping those precious first curls in!


How to make:
  • Cover the inside and outside of a small rectangle box and it's lid in pink parchment paper.
  • Attach white lace around the outside edge of the box lid and just on the corners of the box.
  • From pink card die cut a frame using the 2nd and 3rd sizes up from the smallest Labels Six (Spellbinders S4-230) and attach to the box lid with 3D glue.
  • Add some pink chiffon ribbon around the sides of the lid add a bow to one of the long sides (this will be the front).
  • Stamp the pram and four bottles onto white shrink plastic in Memento Rose Bud.
  • Colour in the hood, apron, bottle tops and bows with pink Promarkers.
  • Cut out and shrink with a heat tool.
  • Using 3D glue attach the pram to the middle of lid.
  • Next put the lid on the box and attach a bottle to each side of the box.
  • Remove the lid and attach a transparent heart bead to the bottom left and top right hand corners of the lid, also one to the bow.
  • Attach a silver bird charm in the top left and a silver feet charm in the bottom right hand corners.
  • Finally add a dark pink gem stone to the pram and one to the other three sides of the ribbon.


This Magnetic Heart was made in the same way but this time I used the Labels Six spellbinders to make a photo frame.


How to make: 
  • Cover the magnetic heart with blue paper.
  • Attach some white ric rac braid around the outside edge.
  • Stamp the pram onto white shrink plastic in Memento Paris Dusk colour in the hood and apron with a blue Promarker, cut out and shrink with a heat tool.
  • From medium blue pearl card die cut a frame using the 2nd and 3rd sizes up from the smallest Big Scalloped Ovals Lg (Spellbinders S4-251) and one from the 3rd size only in blue card onto this stamp the small crown in Paris Dusk under that write PHOTO, glue the outside edge of the frame to the solid blue piece leaving open enough room to insert a photo, attach to the top right hand side of the heart.
  • Stamp the bottle twice onto white pearl card and the bottle top onto blue card in Paris Dusk , with a blue Promarker add spots the bows and cut one out, cut out the other bottle and blue top shape all the pieces and glue together with 3D glue, add a small silver baby feet charm to the bottom right hand side of the bottle.
  • Attach a small silver butterfly charm to the bottom point of the heart.
  • Attach the bottle to the left of the frame and the pram to the bottom point using 3D glue.
  • From medium blue pearl card die cut “Love” (Spellbinders Jewel KeysC5-099) and attach on an angle to the bottle.
  • Finally add five adhesive shimmer dots from the top centre over to the right of the heart, and one to the bow and pram.     


Thursday, 14 March 2013

Pencil Case

When I saw the Vroom, Vroom Stamp set (ref: NC015) from Nina Crafts all I could think was how it would make a great pencil case.....


How to make:
  • Cut a piece of blue sky fabric and lining fabric 24cm x 26cm fold in half with the 24cm edges to the top.
  • Down the side seams trim off 1cm at the top tapering down to nothing by 7cm on each piece.
  • On the sky piece of fabric stamp the tyre track so the bottom line is 10.5cm down from one of the top edges in black fabric paint, when dry iron.
  • Then stamp the car onto red fabric in black fabric paint when dry iron then iron onto HeatnBond  lite.
  • Cut out and iron onto the sky fabric above the track.
  • Sew in place with black stranded cotton.
  • Sew a zip across the top.
  • Sew down the two sides.
  • Open out the seam and line up along the fold.
  • Sew across the corner (sewing line 4.5cm across) to make a flat bottom.
  • Finally make up the lining and attach inside to the zip.

Saturday, 2 March 2013

Pink Fragrance Bag

This Fragrance bag was made using the Beautiful Bouquet (ref: NC014) stamp set from Nina Crafts /Dimension Stamps. I also used Grand Word Perfect (ref: 1803161a).

How to Make
  • Cut a 11cm x 44cm piece of pink fabric fold the fabric in half and stamp the bouquet 2cm up from the fold using purple and green fabric paint, when dry iron as per the instructions and add a lilac bow to the stems.
  • Next stamp "MUM" onto a spare piece of pink fabric in purple fabric paint and over stamp with the bouquet and iron onto HeatnBond, cut out and iron onto the other side of the fold over lapping the letters.
  • Sew in place with dark pink stranded cotton.
  • Sew down each side on the wrong side of the fabric, turn the so the right side is showing turn the top 5cm into the bag and sew white lace around the top outside edge of the bag.
  • Next sew a loop of lilac ribbon 4cm down on the inside and a piece of ribbon long enough to tie around the bag on the outside of the bag.
  • Finally fill the bag and tie the ribbon.

Saturday, 2 February 2013

Nina Crafts: Lilac Ballet Shoe

My daughter has just told me she has a dance show in May so I will need to make some good luck cards. So I played around with some packing that was in a pair of soft slippers, nothing is safe from crafting in my house! 


How to make
  • I cut the shoe from lilac card and stamped it with the square swirl and swirl (window of waves NC003) in purple ink.
  • Inside the shoe I stamped a swirl, Good Luck and Dream in purple.
  • Then I stamped two of the small four petal flowers (Poise passion NC004) in purple ink with one of the petal stamps in each petal cut out and shaped.
  • To finish off I applied lilac glitter glue to the flower and attached it with a silver brad, I also attach some curled card to each side for ribbon.